最开始的想法是编译一个单纯的kernel,将etx4、pci、网卡、键盘等基本驱动编译进kernel,打上iptables_layer7补丁,然后再移植ifconfig,gcc,make,ls,cd,mkdir,touch等程序,将ssh弄好,最后编译安装iptables,这样我就可以在寝室实现练习iptables的命令了(当然更多的是满足心中的恶趣味)。当然,可能还要借助自建DHCP服务器,或者kali-linux等工具让室友网关(当然这台机器会需要三张网卡,我的和室友的分开用)指向我这台最小化安装的能实现firewall、acl、nat为一体的的最小化系统。我觉得这样实验会加强我对iptables和kernel编译的理解和记忆。可惜半途夭折,也不能说半途夭折,以后找个时间继续做就是了~实在不行,我就不编译kernel,只打上iptables_layer7补丁就开始练习iptables命令。。
正经的:
从网上复制下来的一段对源码安装特别中肯的评价(我说的没他好,我就复制了,好像是MySQL官方文档的解释,不太记得了):
源码安装与二进制发行版本相比,如果我们选择了通过源代码进行安装,那么在安装过程中我们能够对软件所做的调整将会更多更灵活一些。因为通过源代码编译我们可以:
- 针对自己的硬件平台选用合适的编译器来优化编译后的二进制代码;
- 根据不同的软件平台环境调整相关的编译参数;
- 针对我们特定应用场景选择需要什么组件不需要什么组件;
- 根据我们的所需要存储的数据内容选择只安装我们需要的字符集;
- 同一台主机上面可以安装多个MySQL或者其他软件;
- 等等其他一些可以根据特定应用场景所作的各种调整。 在源码安装给我们带来更大灵活性的同时,同样也给我们带来了可能引入的隐患:
- 对编译参数的不够了解造成编译参数使用不当可能使编译出来的二进制代码不够稳定;
- 对自己的应用环境把握失误而使用的优化参数可能反而使系统性能更差;
- 还有一个并不能称之为隐患的小问题就是源码编译安装将使安装部署过程更为复杂,所花费的时间更长;
而我的看法是:
- rpm包是针对所有机器,为了支持更多的cpu和平台,它的编译平台自然会很老。而源码编译是针对当前硬件平台进行编译,对于个人和小公司来说这都没什么,但是对于大型门户网站,或者一些其他的高访问量,高并发的服务器,编译后的性能提升的效果就出来了,相对于编译好的rpm软件来说,编译后的软件性能会提升5%左右。这个性能提升绝对值得上编译那点麻烦事。
- 就好像你去酒店吃饭和在家里吃饭一样,去酒店你就只能吃固定样式的饭菜,而在家里,家里人就会为你的胃口调整饭菜,好比我喜欢吃肉,我家里面辣椒炒肉的肉会比饭店酒店里面垃圾炒肉里面的肉多的多的多一样。。。。。
- 卸载的时候也比rpm安装的软件要简单而且稳定的多
先用命令查看硬件信息:
[root@localhost ~]# lspci
00:00.0 Host bridge: Intel Corporation 82P965/G965 Memory Controller Hub (rev 02)
00:01.0 PCI bridge: Intel Corporation 82G35 Express PCI Express Root Port (rev 02)
00:03.0 Unassigned class [ff00]: Parallels, Inc. Virtual Machine Communication Interface
00:05.0 Ethernet controller: Red Hat, Inc Virtio network device
00:0a.0 PCI bridge: Digital Equipment Corporation DECchip 21150
00:0e.0 RAM memory: Red Hat, Inc Virtio memory balloon
00:0f.0 SCSI storage controller: LSI Logic / Symbios Logic 53c1030 PCI-X Fusion-MPT Dual Ultra320 SCSI
00:1d.0 USB controller: Intel Corporation 82801FB/FBM/FR/FW/FRW (ICH6 Family) USB UHCI #1 (rev 02)
00:1d.6 USB controller: NEC Corporation uPD720200 USB 3.0 Host Controller (rev 03)
00:1d.7 USB controller: Intel Corporation 82801FB/FBM/FR/FW/FRW (ICH6 Family) USB2 EHCI Controller (rev 02)
00:1e.0 PCI bridge: Intel Corporation 82801 PCI Bridge (rev f2)
00:1f.0 ISA bridge: Intel Corporation 82801HB/HR (ICH8/R) LPC Interface Controller (rev 02)
00:1f.1 IDE interface: Intel Corporation 82801BA IDE U100 Controller (rev 05)
00:1f.2 SATA controller: Intel Corporation 82801HR/HO/HH (ICH8R/DO/DH) 6 port SATA Controller [AHCI mode] (rev 02)
00:1f.3 SMBus: Intel Corporation 82801H (ICH8 Family) SMBus Controller (rev 02)
00:1f.4 Multimedia audio controller: Intel Corporation 82801BA/BAM AC'97 Audio Controller (rev 02)
01:00.0 VGA compatible controller: Parallels, Inc. Accelerated Virtual Video Adapter
在上面就可以看出各种硬件信息
用一个新磁盘创建两分区,因为是实验,所有我现在创建的分区够用就行
#fdisk /dev/sdb
  Device Boot      Start         End      Blocks   Id  System
/dev/sdb1            2048      104447       51200   83  Linux
/dev/sdb2          104448     1153023      524288   83  Linux
查看分区是否被识别
[root@localhost ~]# cat /proc/partitions
major minor  #blocks  name

  11        0    4209664 sr0
   8        0   24117248 sda
   8        1     512000 sda1
   8        2   23604224 sda2
 253        0   21458944 dm-0
 253        1    2097152 dm-1
   8       16    1048576 sdb
   8       17      51200 sdb1
   8       18     524288 sdb2
格式化:
[root@localhost ~]# mkfs.ext4 /dev/sdb1
[root@localhost ~]# mkfs.ext4 /dev/sdb2
创建两挂载点
#mkdir /mnt/{boot,sysroot}
#mount /dev/sdb1 /mnt/boot
#mount /dev/sdb2 /mnt/sysroot
安装gurb到/mnt
#grub-install --root-directory=/mnt /dev/sdb
清除所有原配置
#make allnoconfig
现在开始配置
#make menuconfig
参数1:kernel版本
General setup
    (ItCys.top-v1.1) Local version - append to kernel release
参数2:CPU型号和多处理器支持
Processor type and features
    Processor family (Core 2/newer Xeon)  --->
    [*] Symmetric multi-processing support
    [ ] SMT (Hyperthreading) scheduler support (NEW) //CPU支持超线程
参数3:支持装载模块
[*] Enable loadable module support --->
参数4:支持ext4文件系统
File systems
    <*> The Extended 4 (ext4) filesystem
参数5:支持PCI总线
Bus options (PCI etc.)
    [*] PCI support
参数5:支持虚拟硬盘(真实硬盘选择其它的)
Device Drivers
    [*] Fusion MPT device support  --->
参数6:支持SATA或者SCSI SATA
Fusion MPT device support
    <*> Serial ATA and Parallel ATA drivers  --->
        <*>   AHCI SATA support
    [*] Fusion MPT device support  --->
        <*>   Fusion MPT ScsiHost drivers for SPI
        <*>   Fusion MPT misc device (ioctl) driver
SCSI
SCSI device support  --->
    {*} SCSI device support
    < > SCSI disk support (NEW)
Fusion MPT device support
    <*>   Fusion MPT ScsiHost drivers for SPI
    <*>   Fusion MPT misc device (ioctl) driver
开始编译
#make bzImage //只编译bz2压缩格式的内核文件,只编译核心,不编译模块
编译过程中其它准备事项:
#cd /mnt/sysroot
#mkdir -pv etc/rc.d/init.d bin sbin root home proc sys lib lib64 var/log usr/{local,share} boot dev
编译完成:
Setup is 13644 bytes (padded to 13824 bytes).
System is 1392 kB
CRC 25abd21e
Kernel: arch/x86/boot/bzImage is ready  (#1)
将kernel拷贝到/mnt/boot下面:
#cp arch/x86/boot/bzImage /mnt/boot/
制作启动文件:
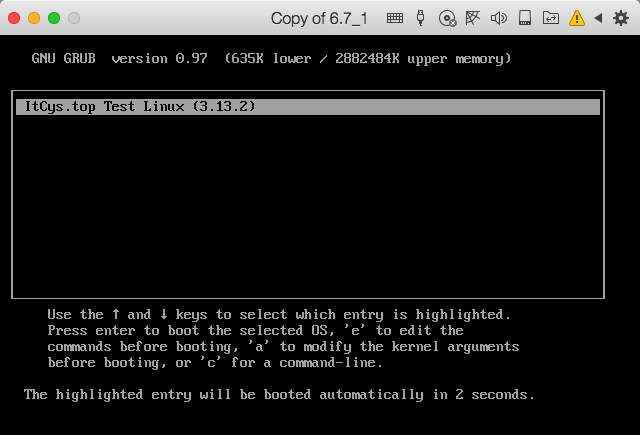
#vim /mnt/boot/grub/grub.conf
default=0
timeout=3
title ItCys.top Test Linux (3.13.2)
        root (hd0,0)
        kernel /bzImage ro root=/dev/sda2
将硬盘给其它虚拟机使用

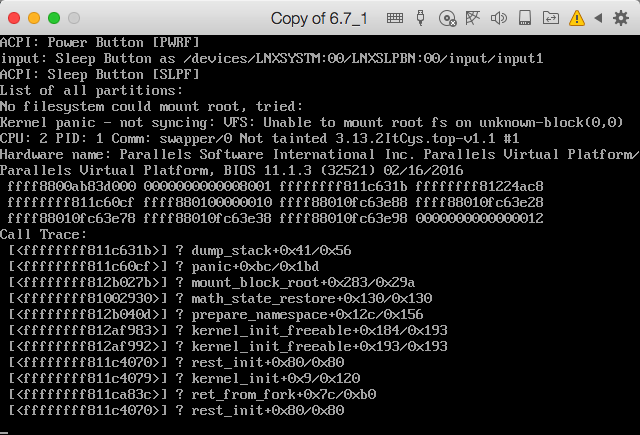
启动失败:挂载问题 因为etx4是elf可执行程序
#make menuconfig
Executable file formats / Emulations
    [*] Kernel support for ELF binaries   //自动点亮的不要去取消
    <*> Kernel support for scripts starting with #!
编译
#make bzImage
编译完成cp过去覆盖
#cp arch/x86/boot/bzImage /mnt/boot/
cp: overwrite `/mnt/boot/bzImage'? y
新建一个copy命令的脚本
#!/bin/bash
#
target=/mnt/sysroot/

[ -d $target ] || mkdir $target

preCommand() {
    if which $1 &> /dev/null; then
        commandPath=`which --skip-alias $1`
        return 0
    else
        echo "No such command."
        return 1
    fi
}

commandCopy() {
    commandDir=`dirname $1`
    [ -d ${target}${commandDir} ] || mkdir -p ${target}${commandDir}
    [ -f ${target}${commandPath} ] || cp $1 ${target}${commandDir}
}

libCopy() {
    for lib in `ldd $1 | egrep -o "/[^[:space:]]+"`; do
        libDir=`dirname $lib`
        [ -d ${target}${libDir} ] || mkdir -p ${target}${libDir}
        [ -f ${target}${lib} ] || cp $lib ${target}${libDir}
    done
}

read -p "Plz enter a command: " command

until [ "$command" == 'quit' ]; do

  if preCommand $command &> /dev/null; then
    commandCopy $commandPath
    libCopy $commandPath
  fi

  read -p "Plz enter a command: " command
done
copy bash 命令
# bash ~/commandcopy.sh
Plz enter a command: bash
Plz enter a command: quit
测试
[root@localhost linux]# chroot /mnt/sysroot/
bash-4.1#
链接
# ln -sv /mnt/sysroot/bin/{bash,sh}
更改grub启动设置,在最后加上init的路径
#vim /mnt/boot/grub/grub.conf
default=0
timeout=3
title ItCys.top Test Linux (3.13.2)
        root (hd0,0)
        kernel /bzImage ro root=/dev/sda2 init=/bin/bash
再继续启动测试机
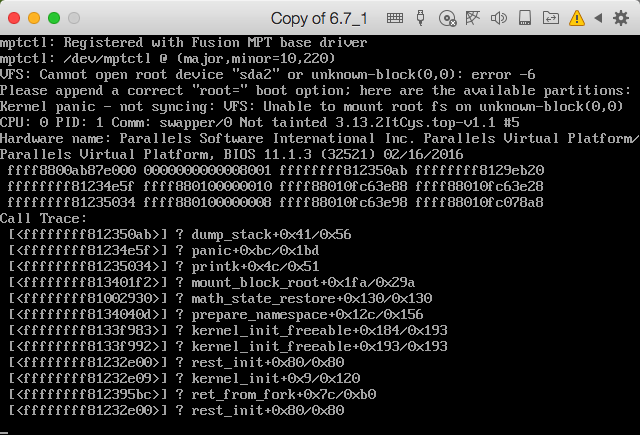
…
后面试了N回,还是启动不了,算是记一次失败的 保存快照,下次在战