在 Docker 与 Kubernetes 的世界里,容器间的通信似乎是信手拈来、宛如魔法。然而,作为工程师,我们深知所谓的“魔法”不过是精巧技术的封装。一旦网络出现异常,或需要构建更复杂的拓扑结构,仅停留在会用层面是远远不够的。要揭开这层神秘面纱,就需要从最基础的 veth pair 和 bridge 入手,逐步剖析容器通信的底层原理。
文章所使用工具: Containerlab
一、网络名称空间
容器之所以是容器,关键在于它利用了 Linux 的名称空间 (Namespace) 技术,为进程提供了一个高度隔离的运行环境。这种隔离涵盖了多个方面,包括 Network (网络)、PID (进程ID)、Mount (文件系统挂载点)、UTS (主机名)、IPC (进程间通信) 和 User (用户) 等。
每个容器都拥有自己独立的一套名称空间,从而保证了容器之间的资源互不干扰。对于在容器中运行的程序而言,它会感觉自己仿佛独占了一整台操作系统。
在这里,我们将重点关注与网络通信最相关的 Network Namespace。
对于容器来说,Network Namespace 的核心作用,是为容器提供一个隔离的、独立的网络协议栈。
我们可以把它想象成一个“网络黑盒”或者一个独立的“网络房间”。在这个“房间”里,拥有一整套完全属于自己的网络资源,与宿主机(Host)以及其他容器的“房间”完全隔离开。
这套独立的网络资源包括:
- 独立的网络接口 (例如
lo,eth0) - 独立的路由表
- 独立的 IP 地址
- 独立的 Netfilter 框架
正是因为有了这样一个隔离的环境,我们才能在其中配置独立的路由,并利用独立的 Netfilter 框架设置防火墙规则,而完全不用担心会影响到宿主机或其他容器。
二、Veth pair
Veth pair 的虚拟名称叫做虚拟网卡对,其实只需要这样理解就行了,他就是一个虚拟网卡对,一端可以插在容器上,另外一端可以插在宿主机上,也可以插在网桥上。
这里实现感受一下:
#!/bin/bash

set -v

cat <<EOF> clab.yaml | clab deploy -t clab.yaml -
name: basic-veth-pair
topology:
  nodes:
    host1:
        kind: linux
        image: nicolaka/netshoot
        network-mode: none
        exec:
        - ip addr add 192.168.1.2/24 dev veth1
        - ip link set veth1 up
        - ip route add default dev veth1

    host2:
        kind: linux
        image: nicolaka/netshoot
        network-mode: none
        exec:
        - ip addr add 192.168.1.3/24 dev veth1
        - ip link set veth1 up
        - ip route add default dev veth1

  links:
     - endpoints: ["host1:veth1", "host2:veth1"]

EOF

sudo clab destroy -t clab.yaml --cleanup

sudo clab deploy -t clab.yaml
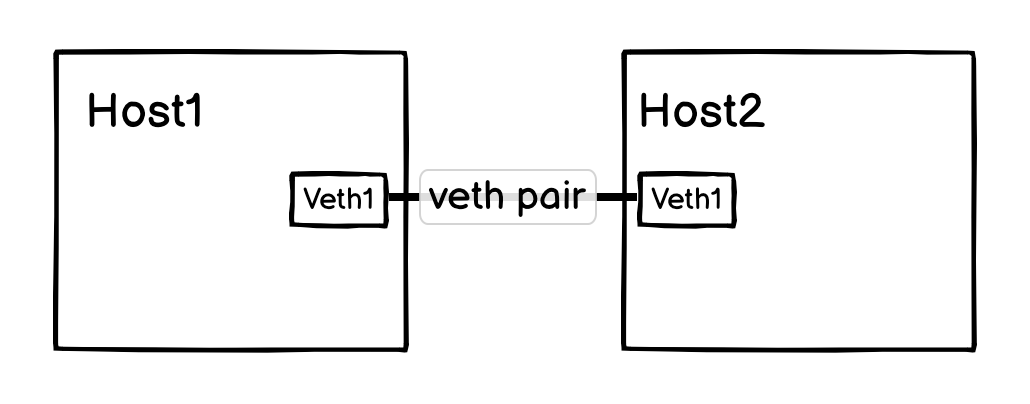
这就是 clab 对应的拓扑图,host1 和 host2 通过 veth pair 连在了一起。
host1:~# ip a s veth1
183209: veth1@if183210: <BROADCAST,MULTICAST,UP,LOWER_UP> mtu 9500 qdisc noqueue state UP group default
    link/ether aa:c1:ab:3d:5d:91 brd ff:ff:ff:ff:ff:ff link-netnsid 0
    inet 192.168.1.2/24 scope global veth1
       valid_lft forever preferred_lft forever
    inet6 fe80::a8c1:abff:fe3d:5d91/64 scope link
       valid_lft forever preferred_lft forever
查看 veth1 网卡,还能看到两个数字,183209、183210,这就是虚拟网卡对 ID ,183209 是自己 ID,183210 是对端 ID ,在复杂网络环境下,能够轻松找到容器对应的 veth pair 对端网卡。
看一个真实的容器环境下虚拟网卡对情况:
(base) root@server:~# docker exec -it f6d501f1ecdb /bin/sh
~ $ ip a
1: lo: <LOOPBACK,UP,LOWER_UP> mtu 65536 qdisc noqueue state UNKNOWN qlen 1000
    link/loopback 00:00:00:00:00:00 brd 00:00:00:00:00:00
    inet 127.0.0.1/8 scope host lo
       valid_lft forever preferred_lft forever
33846: eth0@if33847: <BROADCAST,MULTICAST,UP,LOWER_UP,M-DOWN> mtu 1500 qdisc noqueue state UP
    link/ether 02:42:ac:11:00:02 brd ff:ff:ff:ff:ff:ff
    inet 172.17.0.2/16 brd 172.17.255.255 scope global eth0
       valid_lft forever preferred_lft forever
~ $
(base) root@server:~# ip a | grep -A3 33847
33847: veth0347439@if33846: <BROADCAST,MULTICAST,UP,LOWER_UP> mtu 1500 qdisc noqueue master docker0 state UP group default
    link/ether 7a:47:27:70:2d:4d brd ff:ff:ff:ff:ff:ff link-netnsid 10
    inet6 fe80::7847:27ff:fe70:2d4d/64 scope link
       valid_lft forever preferred_lft forever
回到我们的基础测试环境中,在 host2 抓包,在 host1 ping ,会有什么效果:
host2:~# tcpdump -pne -i veth1
tcpdump: verbose output suppressed, use -v[v]... for full protocol decode
listening on veth1, link-type EN10MB (Ethernet), snapshot length 262144 bytes
03:42:23.771547 aa:c1:ab:3d:5d:91 > ff:ff:ff:ff:ff:ff, ethertype ARP (0x0806), length 42: Request who-has 192.168.1.3 tell 192.168.1.2, length 28
03:42:23.771565 aa:c1:ab:00:93:d6 > aa:c1:ab:3d:5d:91, ethertype ARP (0x0806), length 42: Reply 192.168.1.3 is-at aa:c1:ab:00:93:d6, length 28
03:42:23.771572 aa:c1:ab:3d:5d:91 > aa:c1:ab:00:93:d6, ethertype IPv4 (0x0800), length 98: 192.168.1.2 > 192.168.1.3: ICMP echo request, id 162, seq 1, length 64
03:42:23.771596 aa:c1:ab:00:93:d6 > aa:c1:ab:3d:5d:91, ethertype IPv4 (0x0800), length 98: 192.168.1.3 > 192.168.1.2: ICMP echo reply, id 162, seq 1, length 64
请求和响应都非常简单,host2 直接响应了 ICMP 报文,这就是 veth pair ,虚拟网卡对。当然,实际应用中,基本都是一端在容器,一端在宿主机上。
题外话:深入理解上面拓扑(架构很奇怪,不理解不影响):
虽然拓扑中没有网关,但是配置了默认路由指定了网卡,这种情况下,内核会假定所有目标都在该网卡可达,即二层可达,在这种情况下,所有发出去的报文,主机都会先用 ARP 请求查询目标 mac 地址。
Host1 Ping 223.5.5.5,Host2 tcpdump 内容:
host2:~# tcpdump -pne -i veth1
tcpdump: verbose output suppressed, use -v[v]... for full protocol decode
listening on veth1, link-type EN10MB (Ethernet), snapshot length 262144 bytes
03:55:41.425552 aa:c1:ab:e4:53:e6 > ff:ff:ff:ff:ff:ff, ethertype ARP (0x0806), length 42: Request who-has 223.5.5.5 tell 192.168.2.2, length 28
03:55:42.449338 aa:c1:ab:e4:53:e6 > ff:ff:ff:ff:ff:ff, ethertype ARP (0x0806), length 42: Request who-has 223.5.5.5 tell 192.168.2.2, length 28
03:55:43.473481 aa:c1:ab:e4:53:e6 > ff:ff:ff:ff:ff:ff, ethertype ARP (0x0806), length 42: Request who-has 223.5.5.5 tell 192.168.2.2, length 28
二、Bridge
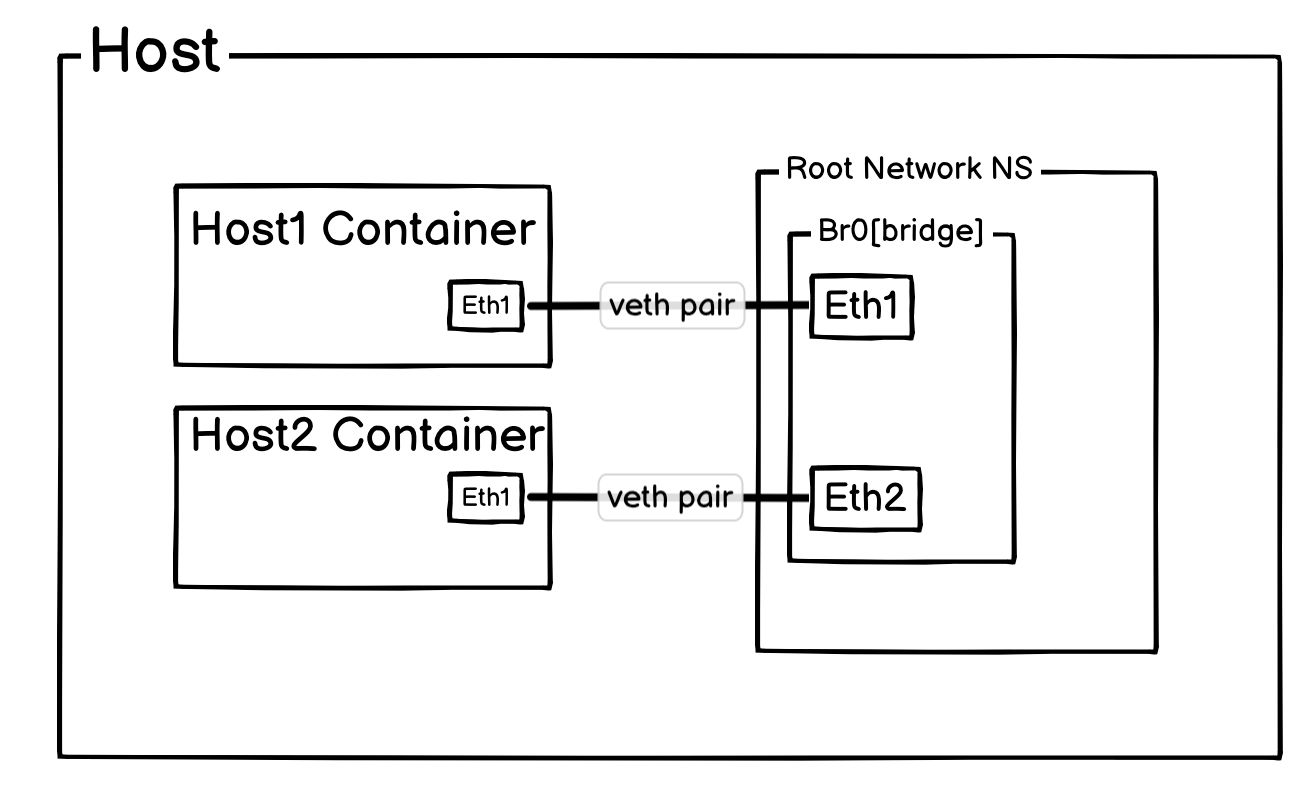
Bridge 的理解也很简单,虚拟交换机。一句话总结就是:它对容器是一个需要 veth pair 连接的交换机;对宿主机则是一张直接接入此交换机网络的虚拟网卡。

可以按上图形式去理解,不过实际上,Br0[bridge] 是位于宿主机网络名称空间的,不过这并不耽误我们理解网桥。
实验配置:
#!/bin/bash

set -v

brctl addbr br0
#ifconfig br0 up
ip link set br0 up

cat <<EOF> clab.yaml | clab deploy -t clab.yaml -
name: basic-bridge-lab
topology:
  nodes:
    br0:
        kind: bridge

    host1:
        kind: linux
        image: nicolaka/netshoot
        network-mode: none
        exec:
        - ip addr add 10.0.0.10/24 dev eth1
        - ip link set eth1 up
        - ip route add default dev eth1

    host2:
        kind: linux
        image: nicolaka/netshoot
        network-mode: none
        exec:
        - ip addr add 10.0.0.11/24 dev eth1
        - ip link set eth1 up
        - ip route add default dev eth1

  links:
     - endpoints: ["br0:eth1", "host1:eth1"]
     - endpoints: ["br0:eth2", "host2:eth1"]

EOF

sudo clab destroy -t clab.yaml --cleanup

sudo clab deploy -t clab.yaml
上面的拓扑图为:
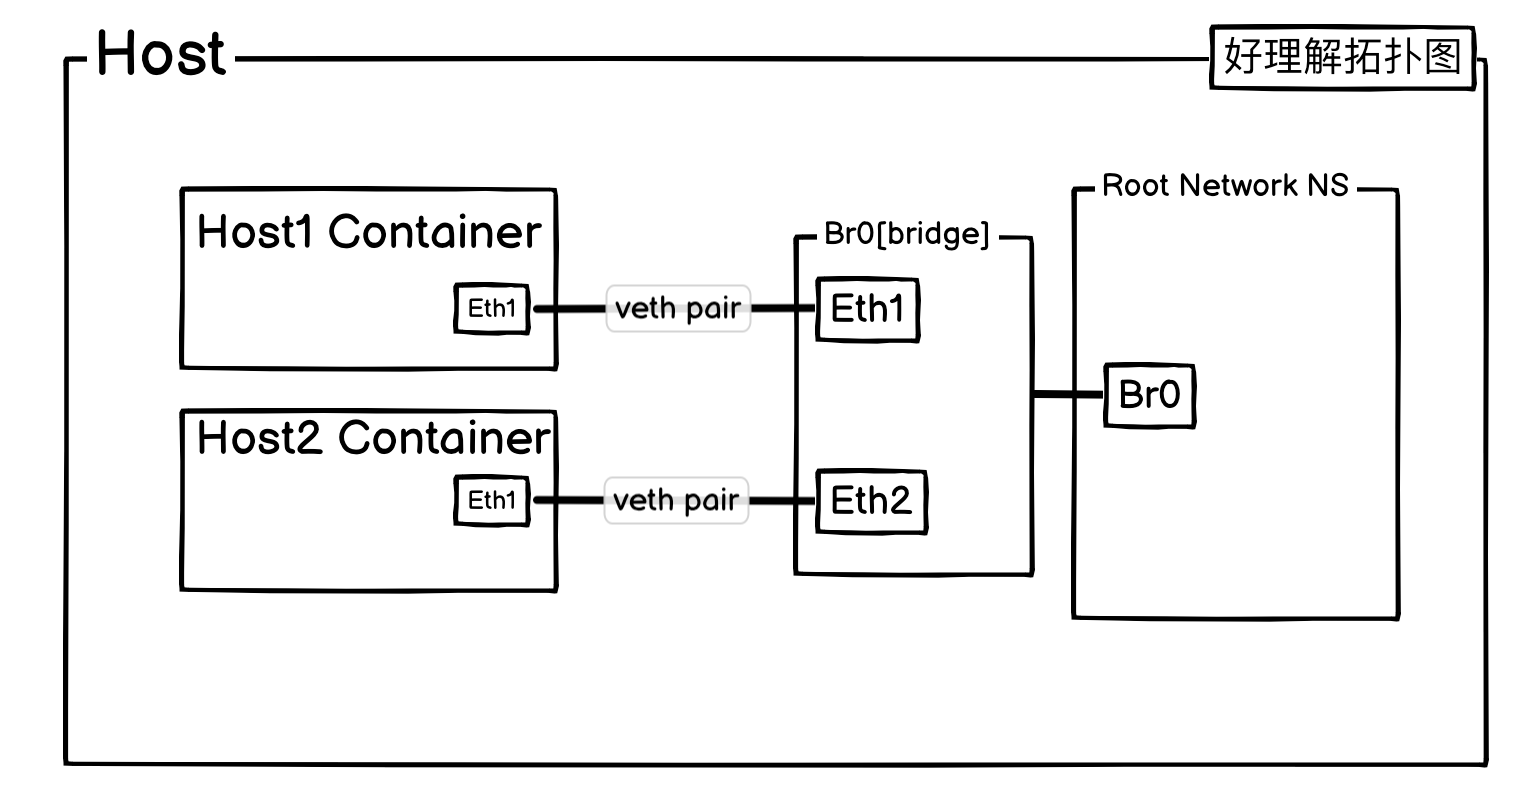
不过为了好理解,这里还是把网桥抽出来:
这个时候 Host1 和 Host2 已经互相之间能通过网桥进行通信了,但是 ping 宿主机的 eth0 IP 还是不通,这是因为当宿主机收到 ARP 请求的时候,它不知道从哪个接口丢回去。
(base) root@server:~# tcpdump -pne -i br0
tcpdump: verbose output suppressed, use -v[v]... for full protocol decode
listening on br0, link-type EN10MB (Ethernet), snapshot length 262144 bytes
12:48:48.433431 aa:c1:ab:3f:74:09 > 33:33:00:00:00:02, ethertype IPv6 (0x86dd), length 70: fe80::a8c1:abff:fe3f:7409 > ff02::2: ICMP6, router solicitation, length 16
12:48:56.625428 aa:c1:ab:24:30:9e > 33:33:00:00:00:02, ethertype IPv6 (0x86dd), length 70: fe80::a8c1:abff:fe24:309e > ff02::2: ICMP6, router solicitation, length 16
12:48:57.646780 aa:c1:ab:24:30:9e > ff:ff:ff:ff:ff:ff, ethertype ARP (0x0806), length 42: Request who-has 192.168.2.56 tell 10.0.0.10, length 28
12:48:58.673503 aa:c1:ab:24:30:9e > ff:ff:ff:ff:ff:ff, ethertype ARP (0x0806), length 42: Request who-has 192.168.2.56 tell 10.0.0.10, length 28
12:48:59.697489 aa:c1:ab:24:30:9e > ff:ff:ff:ff:ff:ff, ethertype ARP (0x0806), length 42: Request who-has 192.168.2.56 tell 10.0.0.10, length 28
如抓包所示,宿主机 br0 上只有 ARP 请求,没有 ARP 响应,这个时候增加一条路由。
ip route add 10.0.0.0/24 dev br0
再测试:
(base) root@server:~# tcpdump -pne -i br0
tcpdump: verbose output suppressed, use -v[v]... for full protocol decode
listening on br0, link-type EN10MB (Ethernet), snapshot length 262144 bytes
12:51:15.018812 aa:c1:ab:24:30:9e > ff:ff:ff:ff:ff:ff, ethertype ARP (0x0806), length 42: Request who-has 192.168.2.56 tell 10.0.0.10, length 28
12:51:15.018872 9e:be:3b:2d:a3:1f > aa:c1:ab:24:30:9e, ethertype ARP (0x0806), length 42: Reply 192.168.2.56 is-at 9e:be:3b:2d:a3:1f, length 28
12:51:15.018896 aa:c1:ab:24:30:9e > 9e:be:3b:2d:a3:1f, ethertype IPv4 (0x0800), length 98: 10.0.0.10 > 192.168.2.56: ICMP echo request, id 180, seq 1, length 64
12:51:15.018964 9e:be:3b:2d:a3:1f > aa:c1:ab:24:30:9e, ethertype IPv4 (0x0800), length 98: 192.168.2.56 > 10.0.0.10: ICMP echo reply, id 180, seq 1, length 64
已经通了。
到此,网桥和容器间互相通信原理已经讲清楚了,Docker 网络和大部分 CNI 网络,都是通过网桥,veth pair,路由,这三者作为基础,再叠加其他功能和特性,来实现容器网络通信。
三、容器访问外部
但是如果容器需要访问外网,应该如何操作?
-
宿主机允许 forward 和配置 SNAT 。
- br0 增加 IP
- 容器配置网关指向 br0
#!/bin/bash

set -v

brctl addbr br0
#ifconfig br0 up
ip link set br0 up

cat <<EOF> clab.yaml | clab deploy -t clab.yaml -
name: basic-bridge-lab
topology:
  nodes:
    br0:
        kind: bridge

    host1:
        kind: linux
        image: nicolaka/netshoot
        network-mode: none
        exec:
        - ip addr add 10.0.0.10/24 dev eth1
        - ip link set eth1 up
        # Host 配置网关指向 br0
        - ip route add default via 10.0.0.1 dev eth1

    host2:
        kind: linux
        image: nicolaka/netshoot
        network-mode: none
        exec:
        - ip addr add 10.0.0.11/24 dev eth1
        - ip link set eth1 up
        # Host 配置网关指向 br0
        - ip route add default via 10.0.0.1 dev eth1

  links:
     - endpoints: ["br0:eth1", "host1:eth1"]
     - endpoints: ["br0:eth2", "host2:eth1"]

EOF

sudo clab destroy -t clab.yaml --cleanup

sudo clab deploy -t clab.yaml

# br0 增加 ip
ip addr add 10.0.0.1/24 dev br0

# 允许 forward 和配置 SNAT 。
sysctl -w net.ipv4.ip_forward=1
iptables -t nat -A POSTROUTING -s 10.0.0.0/24 -j MASQUERADE
- forward: 当报文从 br0 到宿主机,宿主机查看目标 IP 并非自己,就会根据路由表进行转发。
- SNAT如果没有 SNAT 规则,报文会以 Pod IP 作为 Src IP 发出去。收到报文的目标,肯定不知道一个宿主机内部网段的 IP 是如何回去,即无 SNAT 可以出去不能回来。
直接可以 ping 通,br0 抓包情况:
(base) root@server:~# tcpdump -pne -i br0
tcpdump: verbose output suppressed, use -v[v]... for full protocol decode
listening on br0, link-type EN10MB (Ethernet), snapshot length 262144 bytes
12:59:36.053264 aa:c1:ab:2b:f9:bd > ff:ff:ff:ff:ff:ff, ethertype ARP (0x0806), length 42: Request who-has 10.0.0.1 tell 10.0.0.11, length 28
12:59:36.053332 9e:be:3b:2d:a3:1f > aa:c1:ab:2b:f9:bd, ethertype ARP (0x0806), length 42: Reply 10.0.0.1 is-at 9e:be:3b:2d:a3:1f, length 28
12:59:36.053349 aa:c1:ab:2b:f9:bd > 9e:be:3b:2d:a3:1f, ethertype IPv4 (0x0800), length 98: 10.0.0.11 > 223.5.5.5: ICMP echo request, id 183, seq 1, length 64
12:59:36.059279 9e:be:3b:2d:a3:1f > aa:c1:ab:2b:f9:bd, ethertype IPv4 (0x0800), length 98: 223.5.5.5 > 10.0.0.11: ICMP echo reply, id 183, seq 1, length 64
四、外部访问容器
外部访问容器,只需要进行 DNT 即可。
#!/bin/bash

set -v

brctl addbr br0
#ifconfig br0 up
ip link set br0 up

cat <<EOF> clab.yaml | clab deploy -t clab.yaml -
name: basic-bridge-lab
topology:
  nodes:
    br0:
        kind: bridge

    host1:
        kind: linux
        image: nicolaka/netshoot
        network-mode: none
        exec:
        - ip addr add 10.0.0.10/24 dev eth1
        - ip link set eth1 up
        - ip route add default via 10.0.0.1 dev eth1

    host2:
        kind: linux
        # 使用一个完整的 Ubuntu 镜像
        image: nicolaka/netshoot
        network-mode: none
        exec:
        - ip addr add 10.0.0.11/24 dev eth1
        - ip link set eth1 up
        - ip route add default via 10.0.0.1 dev eth1
        - echo "nameserver 223.5.5.5" > /etc/resolv.conf
        - apk add nginx
        - nginx

  links:
     - endpoints: ["br0:eth1", "host1:eth1"]
     - endpoints: ["br0:eth2", "host2:eth1"]

EOF

sudo clab destroy -t clab.yaml --cleanup

sudo clab deploy -t clab.yaml

# br0 增加 ip
ip addr add 10.0.0.1/24 dev br0

# 允许 forward 和配置 SNAT 。
sysctl -w net.ipv4.ip_forward=1
iptables -t nat -A POSTROUTING -s 10.0.0.0/24 -j MASQUERADE

# 增加 DNAT 规则,把 10.0.0.11:80 映射到宿主机的 12345 端口上。
iptables -t nat -A PREROUTING -p tcp --dport 12345 -j DNAT --to-destination 10.0.0.11:80
其他机器访问:
% curl 192.168.2.56:12345
<html>
<head><title>404 Not Found</title></head>
<body>
<center><h1>404 Not Found</h1></center>
<hr><center>nginx</center>
</body>
</html>
结语
所以,回到我们最初的问题,单机容器通信的“魔法”其实很简单:它的核心就是通过 veth pair 这根虚拟网线,将每个容器都连接到作为交换机的 Linux bridge 上。
这两个概念是容器网络最基本的单元。理解了它们,就掌握了分析更复杂网络问题的基础。现在的 CNI 或 Overlay 网络很多设计的底层,都离不开这两个基本组件的组合与延伸。
至于跨主机通信是如何实现的,我们将在后续文章中继续探讨。