尽管 Cilium 以其基于 eBPF 的高性能 CNI 著称,但其能力远不止于集群内部。Cilium 原生的 BGP 功能,让 Kubernetes 集群能真正地参与到外部网络的路由决策中,这在很多混合云或本地数据中心的场景下,是个非常优雅的解决方案。利用 BGP 宣告集群的 Pod CIDR,构建一个无覆盖网络(No-Overlay)的高性能环境。这种模式下,Pod IP 可在外部网络直接路由,彻底消除了封装开销。本文将通过 ContainerLab 和 Kind 搭建实验,演示如何配置 Cilium 与外部路由器对接,从而将 Pod 网段宣告给物理网络。
一、实验架构
各组件版本:
- Host System: Ubuntu 22.04
- Kernel version: 5.15.0-122-generic
- Kind: v0.29.0
- ContainerLab: 0.68.0
- Kubernetes: v1.33.1
- Cilium: v1.17.4
- Vyos: v1.5
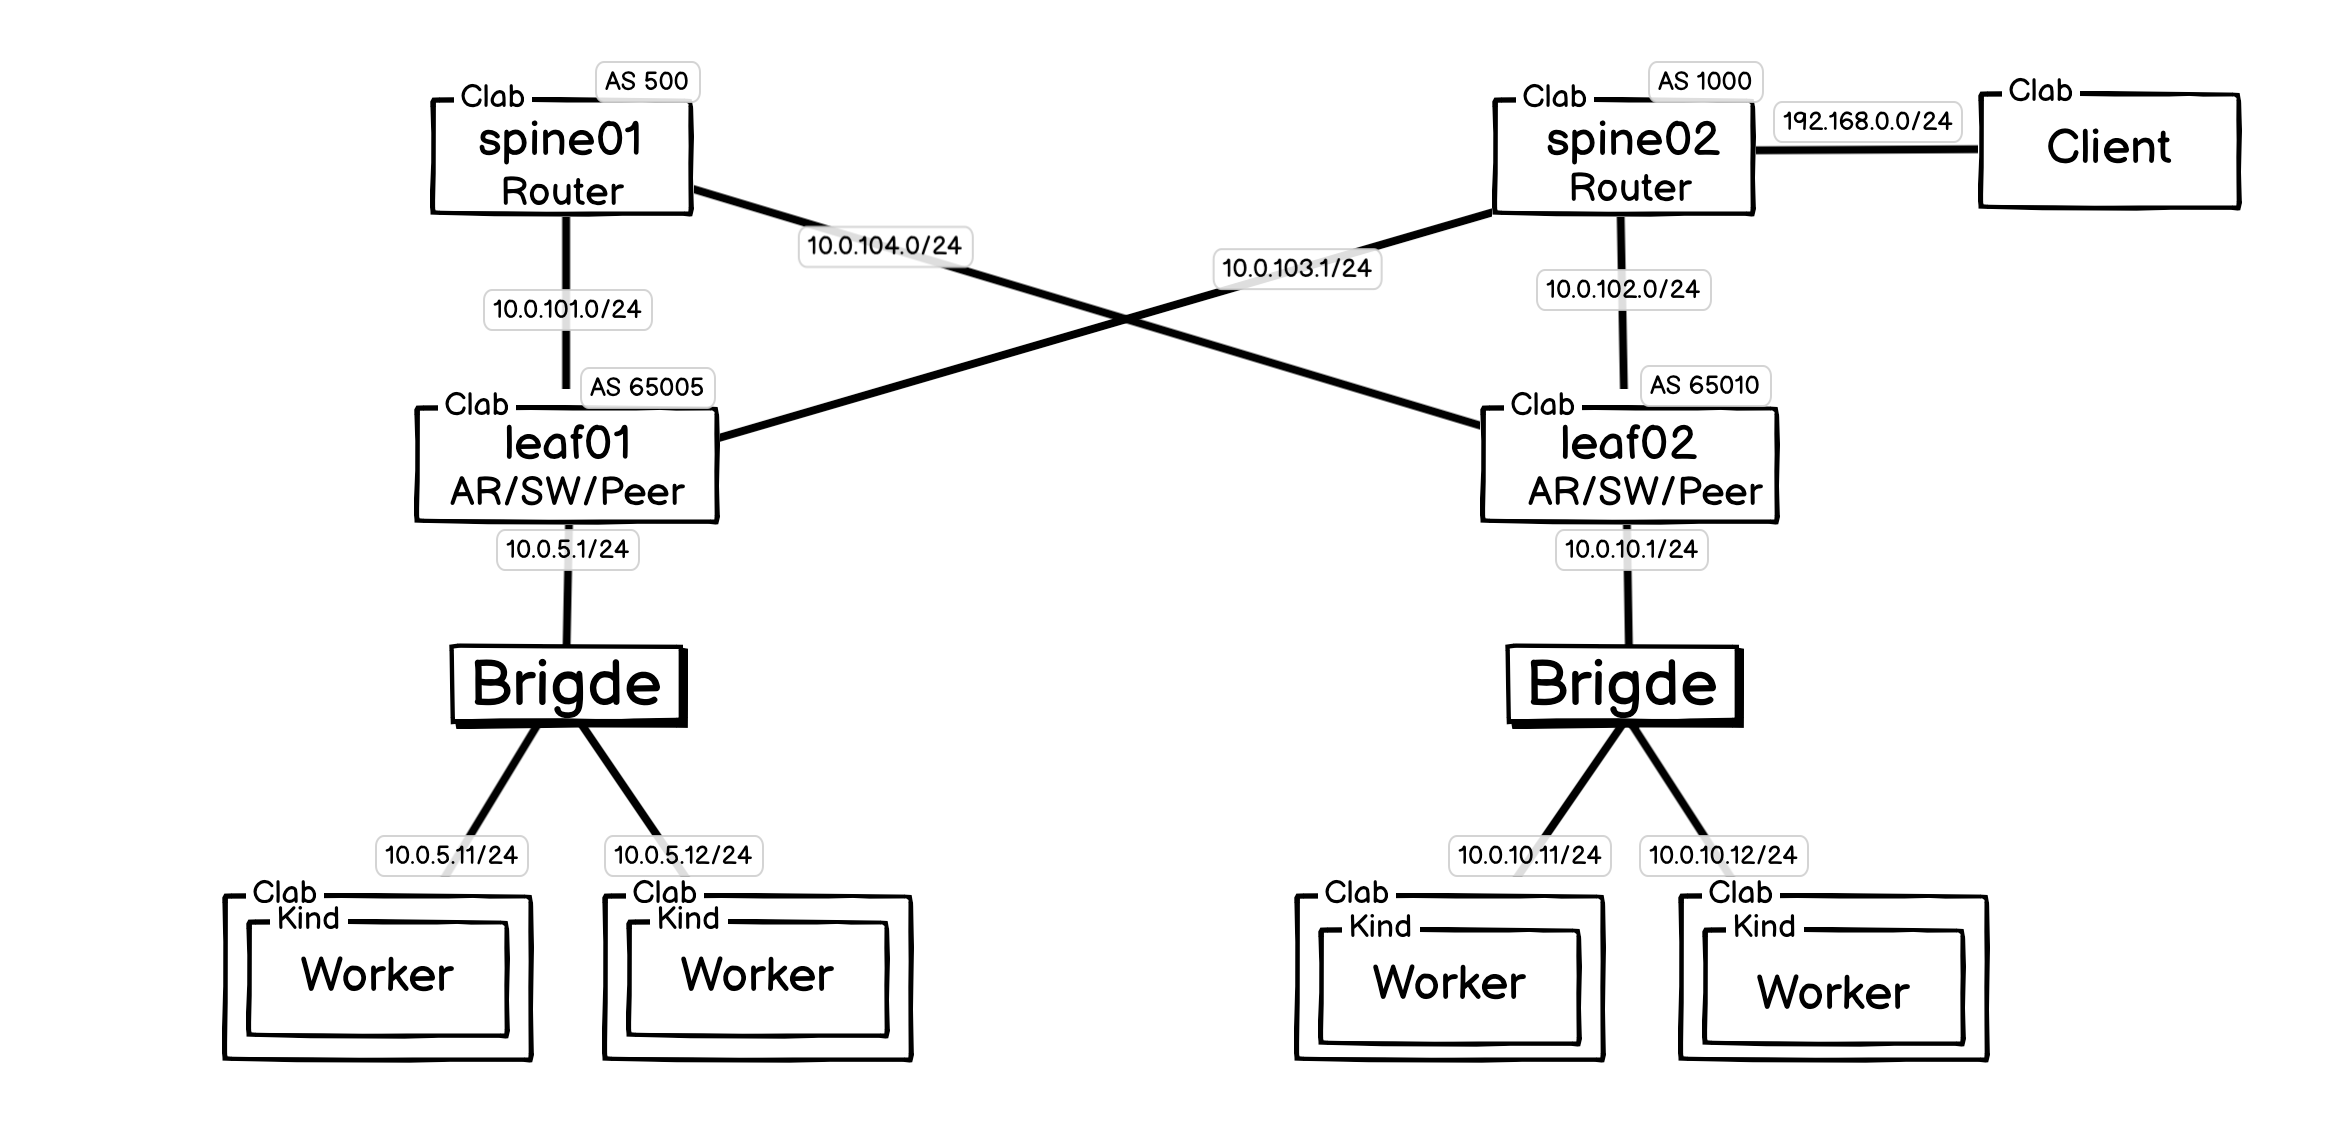
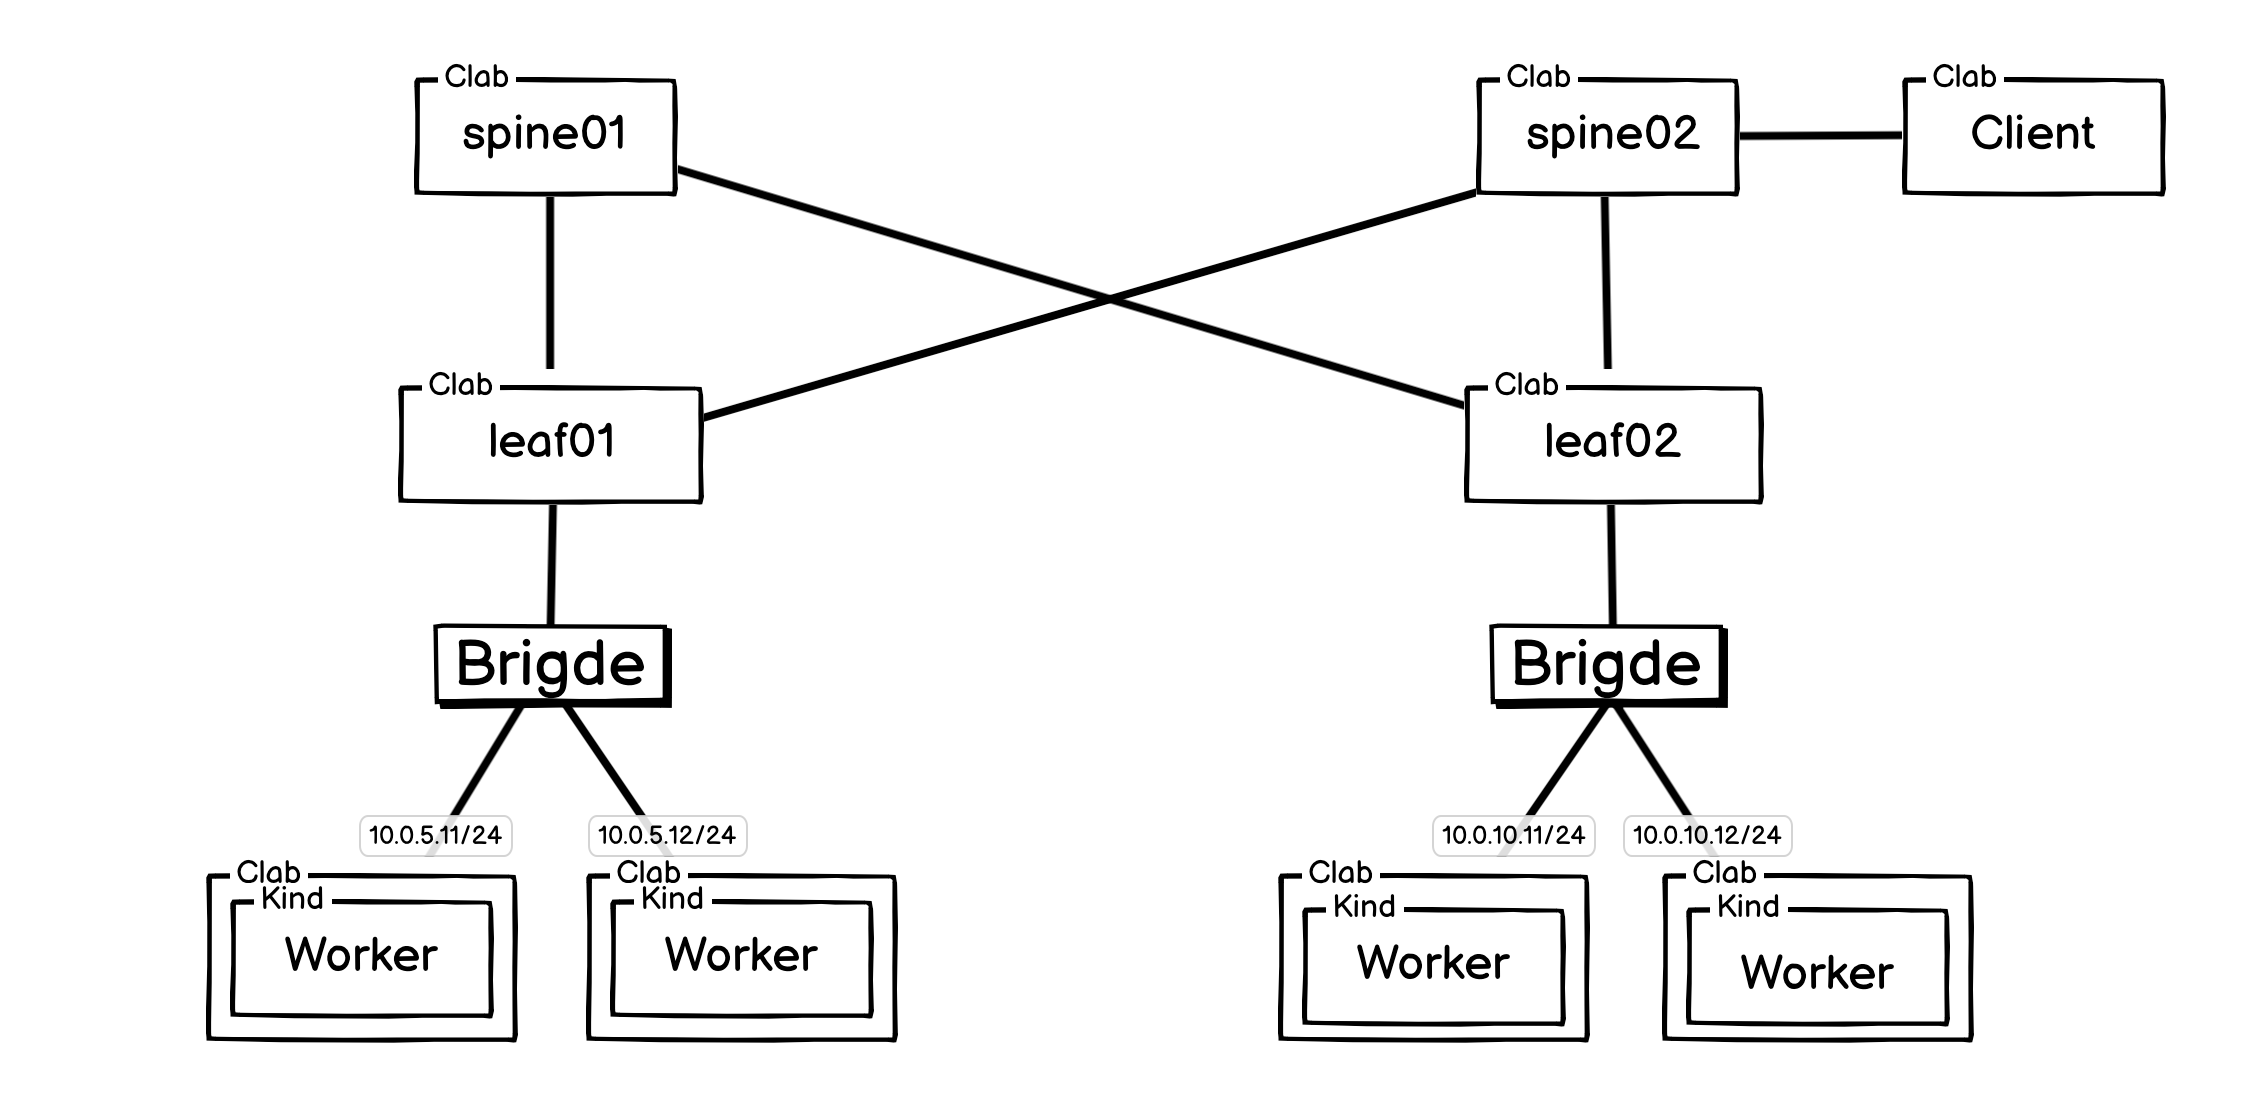
架构情况如下:
- K8s 集群: 集群本身由 Kind 创建和管理,每个
Worker节点都是一个独立的容器。 - 网络骨架: 使用 ContainerLab 搭建一个经典的“核心-接入 (Spine-Leaf)”网络拓扑。图中的
spine和leaf路由器均为由 VyOS 等镜像实例化的容器,并配置了各自的 AS 域和 BGP 对等关系。 - 连接与集成: ContainerLab 在启动 Kind 节点后,会修改其网络配置,将其接入到预设的 Linux 网桥中,实现与
leaf交换机的连接。这个过程使得我们可以为 Kubernetes 节点自定义 IP 地址(如10.0.5.11/24),让它能够与 BGP 网络中的其他设备直接通信。 - Client: 演示整个网络中其它客户端或者非 K8S 环境的 Server 。
二、Vyos 组件
VyOS 是一个基于 Debian Linux 的开源网络操作系统,是一个功能完整、资源占用低的纯软件路由器,能轻松地在任何虚拟环境(如 Docker、VMware、VirtualBox、KVM)中创建复杂的、可随时重置的虚拟网络拓扑,是进行网络功能测试和实验的理想沙箱。
自 VyOS 1.2.0 版本以后,项目团队改变了其发布策略,旨在为专职开发人员提供资金。并不直接对外提供可用的 LTS 版本的 IOS 和 Docker 镜像,只能自己制作。
这里参考官网文档制作了 1.5 版本的镜像(文档中的 Vyos 配置命令也是 Vyos 1.5 版)。
相关文档: Vyos官网源码下载链接, Vyos官网 Docker 镜像制作文档
Vyos 镜像执行步骤:
$ mkdir vyos && cd vyos
$ curl -o vyos-1.5-stream-2025-Q1-generic-amd64.iso https://community-downloads.vyos.dev/stream/1.5-stream-2025-Q1/vyos-1.5-stream-2025-Q1-generic-amd64.iso
$ mkdir rootfs
$ sudo mount -o loop vyos-1.5-stream-2025-Q1-generic-amd64.iso rootfs
$ sudo apt-get install -y squashfs-tools
$ mkdir unsquashfs
$ sudo unsquashfs -f -d unsquashfs/ rootfs/live/filesystem.squashfs
$ sudo tar -C unsquashfs -c . | docker import - vyos:1.5-stream-2025-Q1-generic-amd64
$ sudo umount rootfs
$ cd ..
$ sudo rm -rf vyos
可以参考上面的方法制作镜像,也可以使用我制作好的镜像:hihihiai/vyos:1.5-stream-2025-Q1-generic-amd64
三、BGP 和 路由反射器浅述
BGP 也称边界网关协议,这里不泛化解释,只简单介绍其在 Kubernetes CNI 中的作用。
BGP 在 Kubernetes CNI 中的一个作用是让各个节点通告自己的 Pod 网段。在默认的 iBGP 全互联模式下,每个节点都需要和其他所有节点建立连接,形成 N*(N-1)/2 个 Peer连接,复杂度很高。
为了解决这个问题,可以引入路由反射器 (Route Reflector, RR)。所有的 Kubernetes 节点(客户端)只需要和 RR 建立 Peer关系,然后由 RR 把从一个节点收到的路由反射给其他所有节点。
这样,整体的 Peer 连接数就从 O(N^2) 级别降低到了 O(N) 级别,极大地简化了网络通告压力。
四、Kind 运行集群
cat <<EOF | kind create cluster --name=cilium-bgp --image=kindest/node:v1.33.1 --config=-
kind: Cluster
apiVersion: kind.x-k8s.io/v1alpha4
networking:
  disableDefaultCNI: true
  kubeProxyMode: "none"
  podSubnet: "10.1.0.0/16"
  serviceSubnet: "10.96.0.0/12"
nodes:
  - role: control-plane
    kubeadmConfigPatches:
    - |
      kind: InitConfiguration
      nodeRegistration:
        kubeletExtraArgs:
          node-ip: 10.0.5.11
          node-labels: "rack=rack0"
    - |
      kind: ClusterConfiguration
      apiServer:
        certSANs:
        - "10.0.5.11"
        - "127.0.0.1"
  - role: worker
    kubeadmConfigPatches:
      - |
        kind: JoinConfiguration
        nodeRegistration:
          kubeletExtraArgs:
            node-ip: 10.0.5.12
            node-labels: "rack=rack0"
  - role: worker
    kubeadmConfigPatches:
      - |
        kind: JoinConfiguration
        nodeRegistration:
          kubeletExtraArgs:
            node-ip: 10.0.10.11
            node-labels: "rack=rack1"
  - role: worker
    kubeadmConfigPatches:
      - |
        kind: JoinConfiguration
        nodeRegistration:
          kubeletExtraArgs:
            node-ip: 10.0.10.12
            node-labels: "rack=rack1"
EOF
这里使用 Kind 建立了最底层的 Worker 节点。

五、ContainerLab 配置网络
#!/bin/bash

set -v

sudo clab destroy -t clab.yaml --cleanup

brctl addbr leaf01-br
ip link set leaf01-br up

brctl addbr leaf02-br
ip link set leaf02-br up

cat <<EOF > clab.yaml && clab deploy -t clab.yaml
name: cilium-bgp
mgmt:
  ipv4-subnet: 172.16.100.0/24
topology:
  nodes:
    leaf01-br:
        kind: bridge

    leaf02-br:
        kind: bridge

    spine01:
      kind: linux
      image: hihihiai/vyos:1.5-stream-2025-Q1-generic-amd64
      cmd: /sbin/init
      binds:
        - /lib/modules:/lib/modules
        - ./vyos-boot-conf/spine01-config.boot:/opt/vyatta/etc/config/config.boot

    spine02:
      kind: linux
      image: hihihiai/vyos:1.5-stream-2025-Q1-generic-amd64
      cmd: /sbin/init
      binds:
        - /lib/modules:/lib/modules
        - ./vyos-boot-conf/spine02-config.boot:/opt/vyatta/etc/config/config.boot

    leaf01:
      kind: linux
      image: hihihiai/vyos:1.5-stream-2025-Q1-generic-amd64
      cmd: /sbin/init
      binds:
        - /lib/modules:/lib/modules
        - ./vyos-boot-conf/leaf01-config.boot:/opt/vyatta/etc/config/config.boot

    leaf02:
      kind: linux
      image: hihihiai/vyos:1.5-stream-2025-Q1-generic-amd64
      cmd: /sbin/init
      binds:
        - /lib/modules:/lib/modules
        - ./vyos-boot-conf/leaf02-config.boot:/opt/vyatta/etc/config/config.boot

    control-plane:
      kind: linux
      image: nicolaka/netshoot
      network-mode: container:cilium-bgp-control-plane
      exec:
        - ip addr add 10.0.5.11/24 dev net0
        - ip route replace default via 10.0.5.1

    worker:
      kind: linux
      image: nicolaka/netshoot
      network-mode: container:cilium-bgp-worker
      exec:
        - ip addr add 10.0.5.12/24 dev net0
        - ip route replace default via 10.0.5.1

    worker2:
      kind: linux
      image: nicolaka/netshoot
      network-mode: container:cilium-bgp-worker2
      exec:
        - ip addr add 10.0.10.11/24 dev net0
        - ip route replace default via 10.0.10.1

    worker3:
      kind: linux
      image: nicolaka/netshoot
      network-mode: container:cilium-bgp-worker3
      exec:
        - ip addr add 10.0.10.12/24 dev net0
        - ip route replace default via 10.0.10.1

    client:
      kind: linux
      image: nicolaka/netshoot
      exec:
        - ip addr add 192.168.0.2/24 dev net0
        - ip route replace default via 192.168.0.1


  links:
   - endpoints: [control-plane:net0, leaf01-br:leaf01-br-eth1]
   - endpoints: [worker:net0, leaf01-br:leaf01-br-eth2]
   - endpoints: [worker2:net0, leaf02-br:leaf02-br-eth1]
   - endpoints: [worker3:net0, leaf02-br:leaf02-br-eth2]

   - endpoints: [leaf01:eth2, spine01:eth1]
   - endpoints: [leaf01:eth3, spine02:eth2]
   - endpoints: [leaf01:eth1, leaf01-br:leaf01-br-eth3]

   - endpoints: [leaf02:eth2, spine02:eth1]
   - endpoints: [leaf02:eth3, spine01:eth2]
   - endpoints: [leaf02:eth1, leaf02-br:leaf02-br-eth3]

   - endpoints: [client:net0, spine02:eth3]
EOF

sudo clab deploy -t clab.yaml
配置讲解:
- network-mode: container:clab-bgp-control-plane: ContinerLab 配置的容器会通过此配置关联 Kind 创建的 K8S 集群的节点。
- ip addr add 10.0.5.11/24 dev net0; ip route replace default via 10.0.5.1: 将默认路由配置为新网卡,由此将关联到 ContainerLab 创建的网络中去。
这样,就把基础骨架构建好了。
5.1 网络配置:
上面只是搭建了网络组件,里面具体的协议还未执行。
Vyos 配置方法:
docker exec -it spine01 /bin/bash
# 如果 su vyos 提示用户不存在,级 vyos 还没启动完成,等待一会即可。
root# su vyos
vyos$ configure
# 开始配置
vyos$
# 保存并退出
vyos$ commit
vyos$ save
vyso$ exit
spine01 配置命令
####### 配置基础 IP 信息
set interfaces ethernet eth1 address 10.0.101.1/24
set interfaces ethernet eth2 address 10.0.104.1/24
set interfaces loopback lo

####### 配置自己的 BPG AS 号和 Router-ID 号
set protocols bgp system-as '500'
set protocols bgp parameters router-id '10.0.101.1'

####### 配置邻居信息
set protocols bgp neighbor 10.0.101.2 remote-as 65005
set protocols bgp neighbor 10.0.101.2 address-family ipv4-unicast
# (可选) 为邻居添加描述信息
#set protocols bgp neighbor 10.0.101.2 description 'Peer-to-my-friend'
# 查看邻居状态
# run show ip bgp neighbors 10.0.101.2

set protocols bgp neighbor 10.0.104.2 remote-as 65010
set protocols bgp neighbor 10.0.104.2 address-family ipv4-unicast
# (可选) 为邻居添加描述信息
#set protocols bgp neighbor 10.0.104.2 description 'Peer-to-my-friend'
# 查看邻居状态
# run show ip bgp neighbors 10.0.104.2
spine02 配置命令
####### 配置基础 IP 信息
set interfaces ethernet eth1 address 10.0.102.1/24
set interfaces ethernet eth2 address 10.0.103.1/24
set interfaces ethernet eth3 address 192.168.0.1/24
set interfaces loopback lo

####### 配置自己的 BPG AS 号和 Router-ID 号
set protocols bgp system-as '1000'
set protocols bgp parameters router-id '10.0.102.1'

set protocols bgp neighbor 10.0.102.2 remote-as 65010
# (可选) 为邻居添加描述信息
#set protocols bgp neighbor 10.0.102.2 description 'Peer-to-my-friend'
set protocols bgp neighbor 10.0.102.2 address-family ipv4-unicast
# 查看邻居状态
# run show ip bgp neighbors 10.0.102.2

set protocols bgp neighbor 10.0.103.2 remote-as 65005
# (可选) 为邻居添加描述信息
#set protocols bgp neighbor 10.0.103.2 description 'Peer-to-my-friend'
set protocols bgp neighbor 10.0.103.2 address-family ipv4-unicast
# 查看邻居状态
# run show ip bgp neighbors 10.0.103.2

# 通告自己的网络
set protocols bgp address-family ipv4-unicast network 192.168.0.0/24
leaf01 配置命令
# leaf01 - configure

####### 配置基础 IP 信息
set interfaces ethernet eth1 address 10.0.5.1/24
set interfaces ethernet eth2 address 10.0.101.2/24
set interfaces ethernet eth3 address 10.0.103.2/24
set interfaces loopback lo

####### 配置自己的 BPG AS 号和 Router-ID 号
set protocols bgp system-as '65005'
set protocols bgp parameters router-id '10.0.5.1'

####### 配置邻居信息
set protocols bgp neighbor 10.0.101.1 remote-as 500
set protocols bgp neighbor 10.0.101.1 address-family ipv4-unicast
# (可选) 为邻居添加描述信息
#set protocols bgp neighbor 10.0.101.1 description 'Peer-to-my-friend'
# 查看邻居状态
# run show ip bgp neighbors 10.0.101.1

set protocols bgp neighbor 10.0.103.1 remote-as 1000
set protocols bgp neighbor 10.0.103.1 address-family ipv4-unicast
# (可选) 为邻居添加描述信息
#set protocols bgp neighbor 10.0.103.1 description 'Peer-to-my-friend'
# 查看邻居状态
# run show ip bgp neighbors 10.0.103.1

####### 通告本地网段
set protocols bgp address-family ipv4-unicast network 10.0.5.0/24

####### 配置 BGP Peer
# --- 为 worker01 配置邻居 ---
set protocols bgp neighbor 10.0.5.11 remote-as 65005
set protocols bgp neighbor 10.0.5.11 address-family ipv4-unicast

# 将 worker01 (10.0.5.11) 设置为 leaf01 的客户端
set protocols bgp neighbor 10.0.5.11 address-family ipv4-unicast route-reflector-client

# --- 为 worker02 配置邻居 ---
set protocols bgp neighbor 10.0.5.12 remote-as 65005
set protocols bgp neighbor 10.0.5.12 address-family ipv4-unicast

# 将 worker02 (10.0.5.12) 设置为 leaf01 的客户端
set protocols bgp neighbor 10.0.5.12 address-family ipv4-unicast route-reflector-client

####### 开启 BGP ECMP
# 这条命令会放宽BGP的选路规则,允许它将多条来自不同AS邻居的等价路径都视为最佳路径
# set protocols bgp 65005 parameters bestpath as-path multipath-relax
# 允许 eBGP 使用最多 2 条等价路径
# set protocols bgp 65005 parameters multipath ebgp maximum-paths '2'

####### SNAT
# 创建一条新的排除规则 (序号较小),告诉系统不要对发往内部网络的流量做NAT
set nat source rule 10 description 'Do NOT NAT traffic to private networks'
# 目的地是您整个内部网络的大网段,比如 10.0.0.0/8
set nat source rule 10 destination address '10.0.0.0/8'
# 关键命令:'exclude' 告诉系统,如果匹配这条规则,就直接跳过后续的NAT处理
set nat source rule 10 exclude
# 给 K8S 节点用,让其能够拉取镜像之类。
set nat source rule 100 outbound-interface 'eth0'
set nat source rule 100 source address '10.0.5.0/24'
set nat source rule 100 translation address 'masquerade'
leaf02 配置命令
####### 配置基础 IP 信息
set interfaces ethernet eth1 address 10.0.10.1/24
set interfaces ethernet eth2 address 10.0.102.2/24
set interfaces ethernet eth3 address 10.0.104.2/24
set interfaces loopback lo

####### 配置自己的 BPG AS 号和 Router-ID 号
set protocols bgp system-as '65010'
set protocols bgp parameters router-id '10.0.10.1'

####### 配置邻居信息
set protocols bgp neighbor 10.0.102.1 remote-as 1000
set protocols bgp neighbor 10.0.102.1 address-family ipv4-unicast
# (可选) 为邻居添加描述信息
#set protocols bgp neighbor 10.0.102.1 description 'Peer-to-my-friend'
# 查看邻居状态
# run show ip bgp neighbors 10.0.102.1

set protocols bgp neighbor 10.0.104.1 remote-as 500
set protocols bgp neighbor 10.0.104.1 address-family ipv4-unicast
# (可选) 为邻居添加描述信息
#set protocols bgp neighbor 10.0.104.1 description 'Peer-to-my-friend'
# 查看邻居状态
# run show ip bgp neighbors 10.0.104.1

####### 开启 BGP Peer
# --- 为 worker03 配置邻居 ---
set protocols bgp neighbor 10.0.10.11 remote-as 65010
set protocols bgp neighbor 10.0.10.11 address-family ipv4-unicast

# 将 worker03 (10.0.5.11) 设置为 leaf01 的客户端
set protocols bgp neighbor 10.0.10.11 address-family ipv4-unicast route-reflector-client

# --- 为 worker04 配置邻居 ---
set protocols bgp neighbor 10.0.10.12 remote-as 65010
set protocols bgp neighbor 10.0.10.12 address-family ipv4-unicast

# 将 worker04 (10.0.10.12) 设置为 leaf01 的客户端
set protocols bgp neighbor 10.0.10.12 address-family ipv4-unicast route-reflector-client

set protocols bgp address-family ipv4-unicast network 10.0.10.0/24

####### 开启 BGP ECMP
# 这条命令会放宽BGP的选路规则,允许它将多条来自不同AS邻居的等价路径都视为最佳路径
# set protocols bgp 65010 parameters bestpath as-path multipath-relax
# 允许 eBGP 使用最多 2 条等价路径
# set protocols bgp 65010 parameters multipath ebgp maximum-paths '2'

####### SNAT
set nat source rule 10 description 'Do NOT NAT traffic to private networks'
set nat source rule 10 destination address '10.0.0.0/8'
set nat source rule 10 exclude

set nat source rule 100 outbound-interface 'eth0'
set nat source rule 100 source address '10.0.10.0/24'
set nat source rule 100 translation address 'masquerade'
至此,整个网络和 K8S 集群构建完成。

5.2 扩展内容
上面列举的 BGP Peer 客户端配置方法是一个一个客户端配置,很显然不太方便,下面列举了动态配置方案。
BGP Peer 客户端的简单/动态配置方法:
# 创建一个名为 RR-CLIENTS 的对等体组,并定义所有通用配置
set protocols bgp group RR-CLIENTS type internal
set protocols bgp group RR-CLIENTS remote-as 65005
set protocols bgp group RR-CLIENTS address-family ipv4-unicast route-reflector-client

# 方案1:
# 他们会自动继承上面定义的所有属性
set protocols bgp group RR-CLIENTS neighbor 10.0.5.11
set protocols bgp group RR-CLIENTS neighbor 10.0.5.12
set protocols bgp group RR-CLIENTS neighbor 10.0.5.13

# 方案2:
# 设置BGP监听来自 10.0.5.0/24 网段的连接请求
# 并将成功建立的邻居自动加入 RR-CLIENTS-DYNAMIC 组
set protocols bgp listen-range 10.0.5.0/24 peer-group RR-CLIENTS-DYNAMIC
整个网络配置好之后,会生成一个 boot 文件/opt/vyatta/etc/config/config.boot,复制出来后,只需要使用此配置文件,之前添加的配置就能自动加载。
    spine01:
      kind: linux
      image: hihihiai/vyos:1.5-stream-2025-Q1-generic-amd64
      cmd: /sbin/init
      binds:
        - /lib/modules:/lib/modules
        - ./vyos-boot-conf/spine01-config.boot:/opt/vyatta/etc/config/config.boot
5.3 网络连接情况
连接上 control-plane,可以看到节点之间都是互通的:
clab-bgp-control-plane:~# ping -c 1 10.0.5.11
PING 10.0.5.11 (10.0.5.11) 56(84) bytes of data.
64 bytes from 10.0.5.11: icmp_seq=1 ttl=64 time=0.068 ms

--- 10.0.5.11 ping statistics ---
1 packets transmitted, 1 received, 0% packet loss, time 0ms
rtt min/avg/max/mdev = 0.068/0.068/0.068/0.000 ms

clab-bgp-control-plane:~# ping -c 1 10.0.5.12
PING 10.0.5.12 (10.0.5.12) 56(84) bytes of data.
64 bytes from 10.0.5.12: icmp_seq=1 ttl=64 time=2.31 ms

--- 10.0.5.12 ping statistics ---
1 packets transmitted, 1 received, 0% packet loss, time 0ms
rtt min/avg/max/mdev = 2.309/2.309/2.309/0.000 ms

clab-bgp-control-plane:~# ping -c 1 10.0.10.11
PING 10.0.10.11 (10.0.10.11) 56(84) bytes of data.
64 bytes from 10.0.10.11: icmp_seq=1 ttl=61 time=0.269 ms

--- 10.0.10.11 ping statistics ---
1 packets transmitted, 1 received, 0% packet loss, time 0ms
rtt min/avg/max/mdev = 0.269/0.269/0.269/0.000 ms

clab-bgp-control-plane:~# ping -c 1 10.0.10.12
PING 10.0.10.12 (10.0.10.12) 56(84) bytes of data.
64 bytes from 10.0.10.12: icmp_seq=1 ttl=61 time=0.287 ms

--- 10.0.10.12 ping statistics ---
1 packets transmitted, 1 received, 0% packet loss, time 0ms
rtt min/avg/max/mdev = 0.287/0.287/0.287/0.000 ms

clab-bgp-control-plane:~# traceroute 10.0.10.11
traceroute to 10.0.10.11 (10.0.10.11), 30 hops max, 46 byte packets
 1  10.0.5.1 (10.0.5.1)  0.006 ms  0.005 ms  0.004 ms
 2  10.0.101.1 (10.0.101.1)  0.004 ms  0.005 ms  0.004 ms
 3  10.0.104.2 (10.0.104.2)  0.005 ms  0.005 ms  0.005 ms
 4  10.0.10.11 (10.0.10.11)  0.005 ms  0.005 ms  0.005 ms
六、安装 Cilium CNI
安装 CNI:
#!/bin/bash

# remove taints
kubectl taint nodes $(kubectl get nodes -o name | grep control-plane) node-role.kubernetes.io/control-plane:NoSchedule-
kubectl get nodes -o wide

helm repo add cilium <https://helm.cilium.io/> > /dev/null 2>&1
helm repo update > /dev/null 2>&1

API_SERVER_IP=$(kubectl get nodes -o wide | grep control-plane | awk '{print $6}')
API_SERVER_PORT=6443

# 安装 cilium cni
# --set bgpControlPlane.enabled=true 启用 BPG 策略。
# --set autoDirectNodeRoutes=true 如果你的所有 Kubernetes 节点都连接在同一个交换机上(或者在同一个VLAN里,可以相互直接通信而无需经过路由器),那么就打开这个功能。
# --set kubeProxyReplacement=true --set loadBalancer.mode=dsr Cilium 替代 Kube-Proxy
# --set l2announcements.enabled=true --set externalIPs.enabled=true beta 功能,L2 层宣告 LB IP
helm install cilium cilium/cilium --version 1.17.4 --namespace kube-system --set operator.replicas=1 \
  --set routingMode=native --set ipv4NativeRoutingCIDR="10.1.0.0/16" \
  --set debug.enabled=true --set debug.verbose=datapath --set monitorAggregation=none \
  --set ipam.mode=kubernetes \
  --set k8sServiceHost=${API_SERVER_IP} --set k8sServicePort=${API_SERVER_PORT} \
  --set kubeProxyReplacement=true --set loadBalancer.mode=dsr \
  --set bgpControlPlane.enabled=true \
  --set l2announcements.enabled=true --set externalIPs.enabled=true

# wait all pods ready
kubectl wait --timeout=100s --for=condition=Ready=true pods --all -A

# cilium status
kubectl -nkube-system exec -it ds/cilium -- cilium status

kubectl get crds | grep ciliumbgppeeringpolicies.cilium.io
七、Pod 网络情况测试
测试配置:
cat <<EOF | kubectl apply -f -
apiVersion: apps/v1
kind: DaemonSet
metadata:
  name: test-client
  labels:
    app: test-client
spec:
  selector:
    matchLabels:
      app: test-client
  template:
    metadata:
      labels:
        app: test-client
    spec:
      containers:
      - name: nettool
        image: nicolaka/netshoot
        command: ["/bin/sh", "-c"]
        args: ["sleep 365d"]
EOF
Pod 间互通测试:
root@server:~# kubectl get pods -o wide
NAME                READY   STATUS    RESTARTS   AGE    IP           NODE                       NOMINATED NODE   READINESS GATES
test-client-7fc26   1/1     Running   0          112s   10.1.1.239   cilium-bgp-worker3         <none>           <none>
test-client-ggxw8   1/1     Running   0          112s   10.1.2.191   cilium-bgp-worker2         <none>           <none>
test-client-gwmdh   1/1     Running   0          112s   10.1.0.174   cilium-bgp-control-plane   <none>           <none>
test-client-wpvb7   1/1     Running   0          112s   10.1.3.219   cilium-bgp-worker          <none>           <none>

root@server:~# kubectl exec -it test-client-gwmdh -- ping -c 1 10.1.3.219
PING 10.1.3.219 (10.1.3.219) 56(84) bytes of data.
64 bytes from 10.1.3.219: icmp_seq=1 ttl=60 time=0.400 ms

--- 10.1.3.219 ping statistics ---
1 packets transmitted, 1 received, 0% packet loss, time 0ms
rtt min/avg/max/mdev = 0.400/0.400/0.400/0.000 ms

root@server:~# kubectl exec -it test-client-gwmdh -- ping -c 1 10.1.2.191
PING 10.1.2.191 (10.1.2.191) 56(84) bytes of data.

--- 10.1.2.191 ping statistics ---
1 packets transmitted, 0 received, 100% packet loss, time 0ms

command terminated with exit code 1
可以看到从同 AS 的 Pod 通,但是跨 AS 的所在机器的 Pod 不通。
查看路由器状态,可以发现其实并没有 Pod 网段通告过来。
root@spine01:/# route -n
Kernel IP routing table
Destination     Gateway         Genmask         Flags Metric Ref    Use Iface
0.0.0.0         172.16.100.1    0.0.0.0         UG    0      0        0 eth0
10.0.5.0        10.0.101.2      255.255.255.0   UG    20     0        0 eth1
10.0.10.0       10.0.104.2      255.255.255.0   UG    20     0        0 eth2
10.0.101.0      0.0.0.0         255.255.255.0   U     0      0        0 eth1
10.0.104.0      0.0.0.0         255.255.255.0   U     0      0        0 eth2
172.16.100.0    0.0.0.0         255.255.255.0   U     0      0        0 eth0
配置 BGPP 通告 Pod 网段到整个网络
cat <<EOF | kubectl apply -f -
apiVersion: "cilium.io/v2alpha1"
kind: CiliumBGPPeeringPolicy
metadata:
  name: "rack0-65005"
spec:
  # 这个策略应用到哪些Kubernetes节点上。
  nodeSelector:
    matchLabels:
      rack: rack0
  virtualRouters:
    - localASN: 65005 # 这些Worker节点所在的 ASN
      # 导出您想宣告的Pod CIDR。必须设置。
      exportPodCIDR: true
      # 定义BGP邻居(Peers)
      neighbors:
        - peerAddress: "10.0.5.1/24" # BGP RR 的IP地址
          peerASN: 65005 # BGP Peer 的ASN
---
apiVersion: "cilium.io/v2alpha1"
kind: CiliumBGPPeeringPolicy
metadata:
  name: "rack1-65010"
spec:
  # 这个策略应用到哪些Kubernetes节点上。
  nodeSelector:
    matchLabels:
      rack: rack1
  virtualRouters:
    - localASN: 65010 # 这些Worker节点所在的 ASN
      # 导出您想宣告的Pod CIDR。必须设置。
      exportPodCIDR: true
      # 定义BGP邻居(Peers)
      neighbors:
        - peerAddress: "10.0.10.1/24" # BGP RR 的IP地址
          peerASN: 65010 # BGP Peer 的ASN
EOF
查看路由情况:
root@server:~/bgp-control-plane# docker exec -it clab-cilium-bgp-leaf01 route -n
Kernel IP routing table
Destination     Gateway         Genmask         Flags Metric Ref    Use Iface
0.0.0.0         172.16.100.1    0.0.0.0         UG    0      0        0 eth0
10.0.5.0        0.0.0.0         255.255.255.0   U     0      0        0 eth1
10.0.10.0       10.0.101.1      255.255.255.0   UG    20     0        0 eth2
10.0.101.0      0.0.0.0         255.255.255.0   U     0      0        0 eth2
10.0.103.0      0.0.0.0         255.255.255.0   U     0      0        0 eth3
10.1.0.0        10.0.5.11       255.255.255.0   UG    20     0        0 eth1
10.1.1.0        10.0.101.1      255.255.255.0   UG    20     0        0 eth2
10.1.2.0        10.0.101.1      255.255.255.0   UG    20     0        0 eth2
10.1.3.0        10.0.5.12       255.255.255.0   UG    20     0        0 eth1
172.16.100.0    0.0.0.0         255.255.255.0   U     0      0        0 eth0
192.168.0.0     10.0.103.1      255.255.255.0   UG    20     0        0 eth3
root@server:~/bgp-control-plane# docker exec -it clab-cilium-bgp-spine01 route -n
Kernel IP routing table
Destination     Gateway         Genmask         Flags Metric Ref    Use Iface
0.0.0.0         172.16.100.1    0.0.0.0         UG    0      0        0 eth0
10.0.5.0        10.0.101.2      255.255.255.0   UG    20     0        0 eth1
10.0.10.0       10.0.104.2      255.255.255.0   UG    20     0        0 eth2
10.0.101.0      0.0.0.0         255.255.255.0   U     0      0        0 eth1
10.0.104.0      0.0.0.0         255.255.255.0   U     0      0        0 eth2
10.1.0.0        10.0.101.2      255.255.255.0   UG    20     0        0 eth1
10.1.1.0        10.0.104.2      255.255.255.0   UG    20     0        0 eth2
10.1.2.0        10.0.104.2      255.255.255.0   UG    20     0        0 eth2
10.1.3.0        10.0.101.2      255.255.255.0   UG    20     0        0 eth1
172.16.100.0    0.0.0.0         255.255.255.0   U     0      0        0 eth0
192.168.0.0     10.0.101.2      255.255.255.0   UG    20     0        0 eth1
从路由情况来看,Pod 网段都已经被通告了出来。
查看 Cilium Peer 情况:
root@server:~# kubectl -nkube-system exec -it ds/cilium -- cilium bgp peers
Defaulted container "cilium-agent" out of: cilium-agent, config (init), mount-cgroup (init), apply-sysctl-overwrites (init), mount-bpf-fs (init), clean-cilium-state (init), install-cni-binaries (init)
Local AS   Peer AS   Peer Address   Session       Uptime   Family         Received   Advertised
65005      65005     10.0.5.1:179   established   11m34s   ipv4/unicast   6          1
                                                           ipv6/unicast   0          0
测试:
跨 AS 网络宿主机上面的 Pod 已经能够正常通信。
root@server:~# kubectl exec -it test-client-6h296 -- /bin/bash
test-client-6h296:~# ping -c 1 10.128.3.233
PING 10.128.3.233 (10.128.3.233) 56(84) bytes of data.
64 bytes from 10.128.3.233: icmp_seq=1 ttl=60 time=0.472 ms

--- 10.128.3.233 ping statistics ---
1 packets transmitted, 1 received, 0% packet loss, time 0ms
rtt min/avg/max/mdev = 0.472/0.472/0.472/0.000 ms
test-client-6h296:~# ping -c 1 10.128.1.5
PING 10.128.1.5 (10.128.1.5) 56(84) bytes of data.
64 bytes from 10.128.1.5: icmp_seq=1 ttl=57 time=0.413 ms

--- 10.128.1.5 ping statistics ---
1 packets transmitted, 1 received, 0% packet loss, time 0ms
rtt min/avg/max/mdev = 0.413/0.413/0.413/0.000 ms
Pod 内能正常 Ping 通网络中的机器:
root@server:~/bgp-control-plane# kubectl exec -it test-client-gwmdh -- ping -c 1  192.168.0.2
PING 192.168.0.2 (192.168.0.2) 56(84) bytes of data.
64 bytes from 192.168.0.2: icmp_seq=1 ttl=60 time=0.316 ms

--- 192.168.0.2 ping statistics ---
1 packets transmitted, 1 received, 0% packet loss, time 0ms
rtt min/avg/max/mdev = 0.316/0.316/0.316/0.000 ms
Client 侧 ping Pod 也能正常 Ping 通:
client:~# ping -c 1 10.1.0.174
PING 10.1.0.174 (10.1.0.174) 56(84) bytes of data.
64 bytes from 10.1.0.174: icmp_seq=1 ttl=60 time=0.270 ms

--- 10.1.0.174 ping statistics ---
1 packets transmitted, 1 received, 0% packet loss, time 0ms
rtt min/avg/max/mdev = 0.270/0.270/0.270/0.000 ms
在此架构下, Pod CIDR 已经被通告给当前 BGP 网络,有了这个特性,除了 K8S 本身可以跨 AS 组集群外,整个网络中其它机器也可以和 Pod 进行直接通信。
结束语
至此,已经成功完成了从配置 Cilium BGP 策略,到在外部路由器上学到 Pod CIDR 路由的整个过程。通过 Cilium 的 BGP 功能,构建了一个无覆盖网络的高性能集群,其中 Pod IP 可被外部网络直接路由。这种直连模式消除了网络封装的复杂性和性能损耗,形成了一个更扁平、更高效的数据通路。