LEMMP是从LAMP衍生过来的一种架构,L-Linux,E-Engine x(Nginx),M-Memcached,M-MySQL or Mariadb,P-PHP or Python,基本上算的上集高性能和高拓展性与一身的架构,LEMMP中每一个点都可以单独进行拓展,基本上能容纳从小型公司到中型互联网公司需求,当然如果你把L理解成LVS,那么大公司的需求都能满足了。
性能预览:
- CPU:i5-4590
- 内存:12G
- 虚拟机性能:2G 双核
- 5台全部都是运行在同一台PC机器上面
网络环境:
- 无干扰内部虚拟网络
架构图:
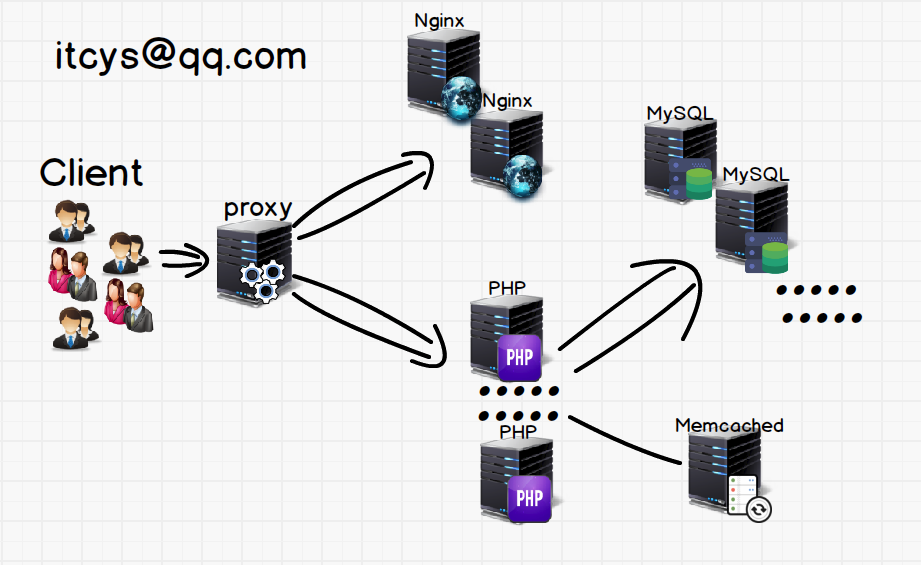
具体架构不是这样的。分两种情况,到时候到下面再解释。
网络分配情况:
- proxy:192.168.100.10
- Nginx-node1:192.168.100.4
- Nginx-node2:192.168.100.5
- php-node1:192.168.100.6
- php-node2:192.168.100.7
- Memcached:192.168.100.8
- MySQL:192.168.100.9
一、安装Nginx:
1、解决依赖关系:
# yum -y install gcc pcre-devel openssl-devel
2、安装
a、配置运行用户
# groupadd -r nginx
# useradd -g nginx -r nginx
b、编译安装。
# tar xf nginx-1.10.1.tar.gz
# cd nginx1.10.1

#./configure \
  --prefix=/usr/local/nginx \
  --sbin-path=/usr/local/nginx/sbin/nginx \
  --conf-path=/etc/nginx/nginx.conf \
  --error-log-path=/var/log/nginx/error.log \
  --http-log-path=/var/log/nginx/access.log \
  --pid-path=/var/run/nginx/nginx.pid  \
  --lock-path=/var/lock/nginx.lock \
  --user=nginx \
  --group=nginx \
  --with-http_ssl_module \
  --with-http_flv_module \
  --with-http_stub_status_module \
  --with-http_gzip_static_module \
  --http-client-body-temp-path=/var/tmp/nginx/client/ \
  --http-proxy-temp-path=/var/tmp/nginx/proxy/ \
  --http-fastcgi-temp-path=/var/tmp/nginx/fcgi/ \
  --http-uwsgi-temp-path=/var/tmp/nginx/uwsgi \
  --http-scgi-temp-path=/var/tmp/nginx/scgi \
  --with-pcre
# make && make install
3、为Nginx提供启动脚本
a、在/etc/rc.d/init.d/下面创建nginx,在里面填入
#!/bin/sh
#
# nginx - this script starts and stops the nginx daemon
#
# chkconfig:   - 85 15
# description:  Nginx is an HTTP(S) server, HTTP(S) reverse \
#               proxy and IMAP/POP3 proxy server
# processname: nginx
# config:      /etc/nginx/nginx.conf
# config:      /etc/sysconfig/nginx
# pidfile:     /var/run/nginx.pid

# Source function library.
. /etc/rc.d/init.d/functions

# Source networking configuration.
. /etc/sysconfig/network

# Check that networking is up.
[ "$NETWORKING" = "no" ] && exit 0

nginx="/usr/sbin/nginx"
prog=$(basename $nginx)

NGINX_CONF_FILE="/etc/nginx/nginx.conf"

[ -f /etc/sysconfig/nginx ] && . /etc/sysconfig/nginx

lockfile=/var/lock/subsys/nginx

make_dirs() {
   # make required directories
   user=`nginx -V 2>&1 | grep "configure arguments:" | sed 's/[^*]*--user=\([^ ]*\).*/\1/g' -`
   options=`$nginx -V 2>&1 | grep 'configure arguments:'`
   for opt in $options; do
       if [ `echo $opt | grep '.*-temp-path'` ]; then
           value=`echo $opt | cut -d "=" -f 2`
           if [ ! -d "$value" ]; then
               # echo "creating" $value
               mkdir -p $value && chown -R $user $value
           fi
       fi
   done
}

start() {
    [ -x $nginx ] || exit 5
    [ -f $NGINX_CONF_FILE ] || exit 6
    make_dirs
    echo -n $"Starting $prog: "
    daemon $nginx -c $NGINX_CONF_FILE
    retval=$?
    echo
    [ $retval -eq 0 ] && touch $lockfile
    return $retval
}

stop() {
    echo -n $"Stopping $prog: "
    killproc $prog -QUIT
    retval=$?
    echo
    [ $retval -eq 0 ] && rm -f $lockfile
    return $retval
}

restart() {
    configtest || return $?
    stop
    sleep 1
    start
}

reload() {
    configtest || return $?
    echo -n $"Reloading $prog: "
    killproc $nginx -HUP
    RETVAL=$?
    echo
}

force_reload() {
    restart
}

configtest() {
  $nginx -t -c $NGINX_CONF_FILE
}

rh_status() {
    status $prog
}

rh_status_q() {
    rh_status >/dev/null 2>&1
}

case "$1" in
    start)
        rh_status_q && exit 0
        $1
        ;;
    stop)
        rh_status_q || exit 0
        $1
        ;;
    restart|configtest)
        $1
        ;;
    reload)
        rh_status_q || exit 7
        $1
        ;;
    force-reload)
        force_reload
        ;;
    status)
        rh_status
        ;;
    condrestart|try-restart)
        rh_status_q || exit 0
            ;;
    *)
        echo $"Usage: $0 {start|stop|status|restart|condrestart|try-restart|reload|force-reload|configtest}"
        exit 2
esac
b、加入服务列表并设置开机启动
# chmod +x /etc/rc.d/init.d/nginx
# chkconfig --add nginx
# chkconfig nginx on
二、安装PHP
1、解决依赖关系
[root@php_node2 ~]# yum -y install libmcrypt libmcrypt-devel mhash mhash-devel bzip2-devel openssl-devel libxml2-devel
2、编译安装
# tar xf php-5.4.26.tar.bz2
# cd php-5.4.26

# ./configure --prefix=/usr/local/php \
--with-openssl \                           启用SSL加密传输
--enable-fpm \                             启用php-fpm
--enable-mbstring  \                       多字节字串,中文2字节才能组成一个字串
--with-freetype-dir  \                     字体生成工具,需要安装freetype-devel
--with-jpeg-dir \                          启用jpeg
--with-png-dir  \                          启用png
--with-zlib \                              压缩库
--with-libxml-dir=/usr \                   解析xml的,默认去/usr/local下面找,
--enable-xml \
--with-mcrypt \                            没装libmcrypt-devel,就不要这项
--with-config-file-path=/etc \             配置文件php.ini存放地址
--with-config-file-scan-dir=/etc/php.d \   扩展配置文件存放地
--with-bz2 \                               支持bz2压缩
--enable-maintainer-zts \                  安装httpd的时候使用了event,这里就需要启用
--with-mysql=mysqlnd --with-pdo-mysql=mysqlnd --with-mysqli=mysqlnd
//mysqlnd从PHP5.3开始可用,编译时绑定到它就不用和具体的MySQL客户端库绑定形成依赖,从PHP5.4开始成为默认设置

# make && make install
3、后续配置
a、为PHP提供配置文件
# cp php.ini-production /etc/php.ini
b、为php-fpm提供基础配置
# cp sapi/fpm/init.d.php-fpm  /etc/rc.d/init.d/php-fpm
# chmod +x /etc/rc.d/init.d/php-fpm
# chkconfig --add php-fpm
# chkconfig php-fpm on
c、配置php-fpm
# cp /usr/local/php/etc/php-fpm.conf.default /usr/local/php/etc/php-fpm.conf

# vim /usr/local/php/etc/php-fpm.conf
根据需求更改下面几项
pm.max_children = 50      //最大线程数
pm.start_servers = 5      //启动进程的时候的线程数
pm.min_spare_servers = 2  //最少闲置线程数
pm.max_spare_servers = 8  //最多闲置线程数
pid = /usr/local/php/var/run/php-fpm.pid
listen = PHPServerIP:9000

# service php-fpm start
d、检查
# ps aux | grep php-fpm
# ss -tunlp | grep php-fpm
三、安装Memcached
1、解决依赖关系
# tar xf libevent-2.0.20-stable.tar.gz
# cd libevent-2.0.20-stable
# ./configure --prefix=/usr/local/libevent
# make && make install
2、编译安装
# tar xf memcached-1.4.15.tar.gz
# cd  memcached-1.4.15
# ./configure --prefix=/usr/local/memcached --with-libevent=/usr/local/libevent
3、提供启动脚本,在/etc/rc.d/init.d/下面建立mancached,内容为
#!/bin/bash
#
# Init file for memcached
#
# chkconfig: - 86 14
# description: Distributed memory caching daemon
#
# processname: memcached
# config: /etc/sysconfig/memcached

. /etc/rc.d/init.d/functions

## Default variables
PORT="11211"
USER="nobody"
MAXCONN="1024"
CACHESIZE="1024"    //根据自己内存进行修改
OPTIONS=""

RETVAL=0
prog="/usr/local/memcached/bin/memcached"
desc="Distributed memory caching"
lockfile="/var/lock/subsys/memcached"

start() {
        echo -n $"Starting $desc (memcached): "
        daemon $prog -d -p $PORT -u $USER -c $MAXCONN -m $CACHESIZE "$OPTIONS"
        RETVAL=$?
        [ $RETVAL -eq 0 ] && success && touch $lockfile || failure
        echo
        return $RETVAL
}

stop() {
        echo -n $"Shutting down $desc (memcached): "
        killproc $prog
        RETVAL=$?
        [ $RETVAL -eq 0 ] && success && rm -f $lockfile || failure
        echo
        return $RETVAL
}

restart() {
        stop
        start
}

reload() {
        echo -n $"Reloading $desc ($prog): "
        killproc $prog -HUP
        RETVAL=$?
        [ $RETVAL -eq 0 ] && success || failure
        echo
        return $RETVAL
}

case "$1" in
  start)
        start
        ;;
  stop)
        stop
        ;;
  restart)
        restart
        ;;
  condrestart)
        [ -e $lockfile ] && restart
        RETVAL=$?
        ;;
  reload)
        reload
        ;;
  status)
        status $prog
        RETVAL=$?
        ;;
   *)
        echo $"Usage: $0 {start|stop|restart|condrestart|status}"
        RETVAL=1
esac

exit $RETVAL
4、加入服务,并设置开机启动
# chmod +x /etc/rc.d/init.d/memcached
# chkconfig --add memcached
# chkconfig memcached on
四、编译安装MySQL
实际生产环境的读者可以去找下我之前编译安装LAMP的时候安装MySQL的方法。这次测试我就不添加硬盘,也不分区了。直接就建立一个文件夹作为数据目录了
1、创建用户
# group -r -g 306 mysql
# useradd -r -u 306 -g -d /data/mydata mysql mysql
2、解决依赖性
# yum -y install bison-devel gcc gcc-c++ ncurses-devel
3、编译安装
# yum -y install cmake
# tar xf mysql-5.5.33.tar.gz
# cd mysql-5.5.33
# # cmake . \
-DCMAKE_INSTALL_PREFIX=/usr/local/mysql \  //指定安装目录
-DMYSQL_DATRADIR=/date/mydata \           //指定数据目录
-DSYSCONFDIR=/etc \                        //指定配置文件目录
-DWITH_INNOBASE_STORAGE_ENGINE=1 \         //编译INNODB存储引擎
-DWITH_ARCHIVE_STORAGE_ENGINE=1 \          //编译ARCHIVE存储引擎
-DWITH_BLACKHOLE_STORAGE_ENGINE=1 \        //编译BLACKHOLE存储引擎
-DWITH_READLINE=1 \                        //高级功能支持选项
-DWITH_SSL=system \                        //支持SSL传输
-DWITH_ZLIB=system \                       //支持压缩传输
-DWITH_LIBWRAP=0 \                         //停止支持tcp_wrapper
-DMYSQL_UNIX_ADDR=/tmp/mysql.sock \        //SOCKET文件存放地
-DDEFAULT_CHARSET=utf8 \
-DDEFAULT_COLLATION=utf8_general_ci
4、后续操作
# cd /usr/local/mysql
# cp support-files/mysql.server /etc/rc.d/init.d/mysqld
# chkconfig --add mysqld
# chkconfig mysqld on
# cat support-files/my-huge.cnf > /etc/my.cnf
# vim /etc/my.cnf
[client]
datadir = /date/mydata     //你的数据目录
# scripts/mysql_install_db --user=mysql --datadir=/mysql/mydata
# service mysqld start
Starting MySQL.. SUCCESS!
# mysql
mysql> GRANT ALL ON *.* TO 'phpUser'@'192.168.100.%' IDENTIFIED BY 'phpPass';
mysql> FLUSH PRIVILEGES;
五、结合Nginx和PHP
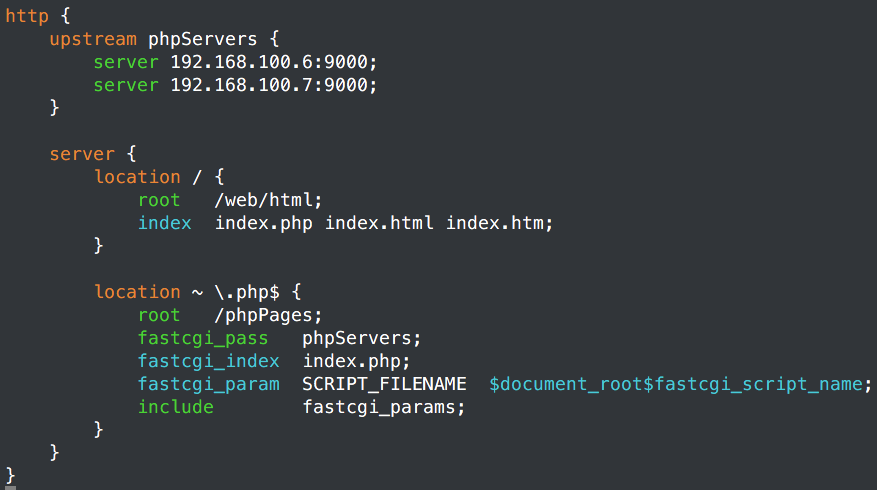
1、在Nginx配置文件中设置将所有php的资源请求都由fastcgi交给后端的php Server处理
vim /etc/nginx/nginx.conf
http{
...
    upstream phpServers {   //定义一组PHP Server,组名为phpServers
        server 192.168.100.6:9000;
        server 192.168.100.7:9000;
    }
...
        location / {
            root   /web/html;
            index  index.php index.html index.htm;  //在这里新加入index.php
        }
...
    location ~ \.php$ {
            root   /phpPages;
            fastcgi_pass   phpServers;  //这个就是调用上面upstream定义的一组php服务器
            #fastcgi_pass  192.168.100.6:9000;  //如果上面的不行,就先用这条进行单台PHP连通性测试
            fastcgi_index  index.php;
            fastcgi_param  SCRIPT_FILENAME  $document_root$fastcgi_script_name;
             //$document_root就是当前上下文中root指令的值;$fastcgi_script_name就是请求的php的名称
            include        fastcgi_params;
        }
}
因为没有代码高亮,实在看着难受,我还是把需要修改的指令截取出来,我已经将不需要修改的临时删除了,这个只是为了截图才这样的。到时候是不会保存的。对了,可能你用vim打开nginx.conf也没有代码高亮,请自行google “nginx.vim”解决
2、在PHP Server创建测试页面
# mkdir /phpPages
# vim /phpPages/test.php
<?php
      phpinfo()
?>
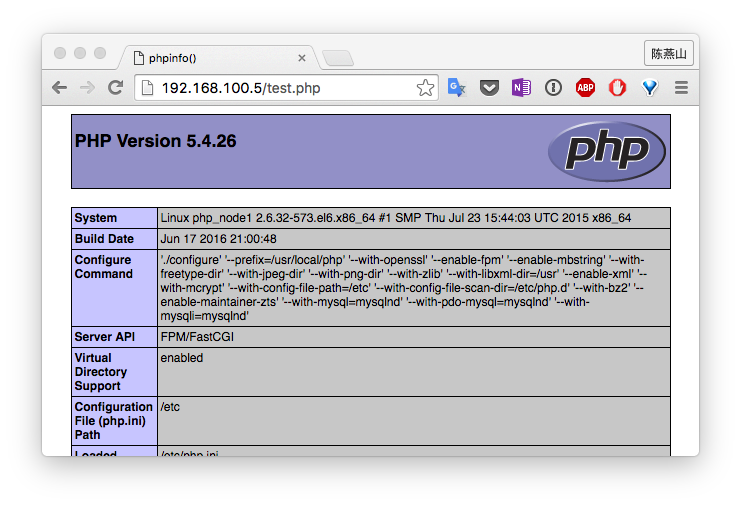
好了,PHP和Nginx已经通了,而且是PHP是以组的形式
六、PHP和MySQL的结合
1、建立测试页面
vim /phpPages/testMySQL.php
<?php
      $link=mysql_connect('192.168.100.9','phpUser','phpPass');
        if(!$link)
                echo "<h1>connect MySQL failed</h1>";
        else
                echo "<h1>connect success</h1>";
        mysql_close();
?>
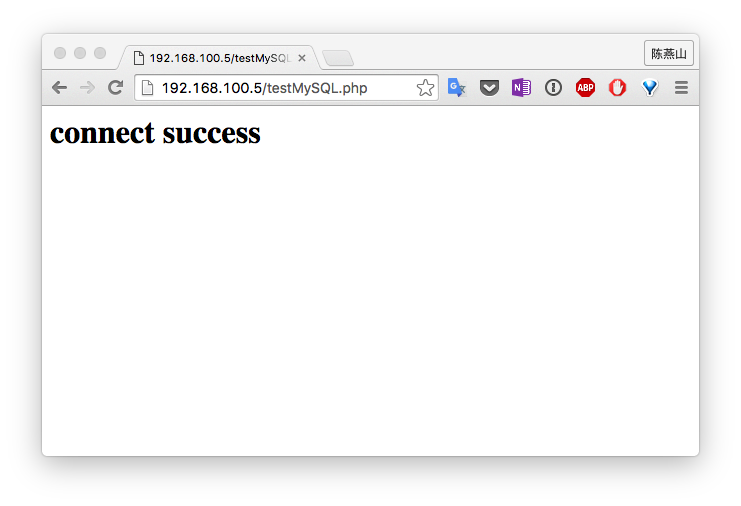
MySQL和PHP连接成功。
Memcache
现在应该主角Mencache出场了。Memcached在这个集群中有两个作用,
- 缓存MySQL中查询频繁的结果
- 作为PHP Server的session共享服务器
这两点作用根本就不是什么锦上添花,而是雪中送碳,session保持不用说,这个是必须要,但是服务器少的可以用session共享实现,但是MySQL作为后端服务器。要是有多台,想好好的命中查询。共享缓存服务器是不二选择。
一、让Memcache连接上PHP
1、启动Memcached
# service memcached start
# ss -tunlp | grep 11211   //检查监听的是否有外部地址
2、使PHP支持Memcache(两台都做)
# tar xf memcache-2.2.7.tgz
# cd memcache-2.2.7
# /usr/local/php/bin/phpize   //检查是否有问题,有问题也比较简单。
# ./configure --with-php-config=/usr/local/php/bin/php-config --enable-memcache
# make && make install
完成后会出现/usr/local/php/lib/php/extensions/no-debug-zts-20100525/
# vim /etc/php.ini
//在Dynamic Extensions区域中加入下面行。这个路径是上面make的时候出现的
extension=/usr/local/php/lib/php/extensions/no-debug-zts-20100525/memcache.so
3、建立测试页面
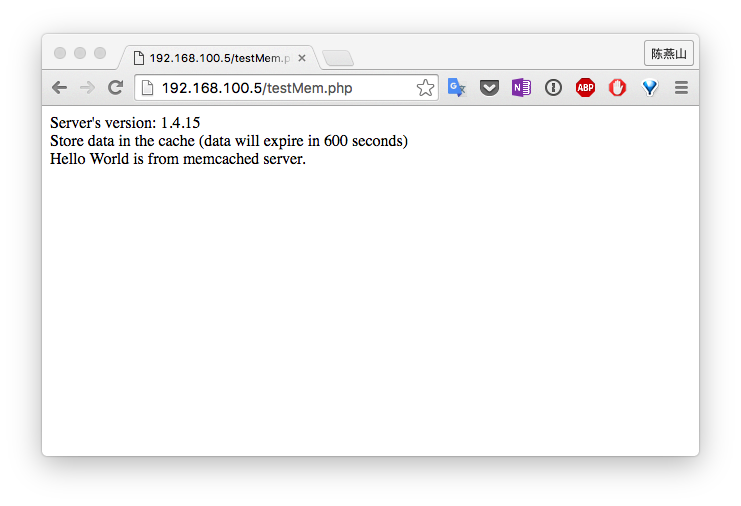
<?php
$mem = new Memcache;
$mem->connect("192.168.100.8", 11211)  or die("Could not connect");

$version = $mem->getVersion();
echo "Server's version: ".$version."<br/>\n";

$mem->set('hellokey', 'Hello World', 0, 600) or die("Failed to save data at the memcached server");
echo "Store data in the cache (data will expire in 600 seconds)<br/>\n";

$get_result = $mem->get('hellokey');
echo "$get_result is from memcached server.";
?>
4、效果
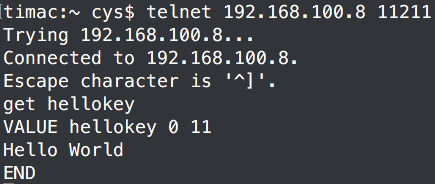
5、连接上Memcached服务器查看hellokey键的值
二、session保持
我们实验2种方式。因为这次是用Nginx作为前端调度器,所以能直接将PHP和HTML分发到不同的服务器上面去,但是前端要是LVS作为前端调度器,这个时候就的考虑LVS调度到Nginx(Apache),Nginx(Apache)再自己再将PHP通过FastCGI转发给后端PHP Server。自己处理静态页面就行了。
1、方法1:Nginx作为前端调度器,将请求PHP和HTML的请求转发到后端不同的服务器组。
也就是上面那张架构图讲述的结构。
a、安装Nginx
b、配置
http {
...
    upstream staticPageServers {
        ip_hash;    //基于Clinet IP hash调度,可以用来实现session保持,不过需要用在php Servers段,这里因为是演示memcached,所以就放这个位置了
        server 192.168.100.4 weight=1 max_fails=3 fail_timeout=2;
        server 192.168.100.5 weight=1 max_fails=3 fail_timeout=2;
    }

    upstream phpServers {
        least_conn;    //最少连接,不知道调度算法的可以看下我那篇LVS理论
        server 192.168.100.6:9000 weight=1 max_fails=3 fail_timeout=2;
        server 192.168.100.7:9000 weight=1 max_fails=3 fail_timeout=2;
    }
...
    server {
...
        server_name a.com;
...
        location / {
            proxy_pass http://staticPageServers/;
            index  index.php index.html index.htm;
        }
...
        location ~ \.php$ {
            root   /phpPages;
            fastcgi_pass   phpServers;
            fastcgi_index  index.php;
            fastcgi_param  SCRIPT_FILENAME  $document_root$fastcgi_script_name;
            include        fastcgi_params;
        }
    }
}
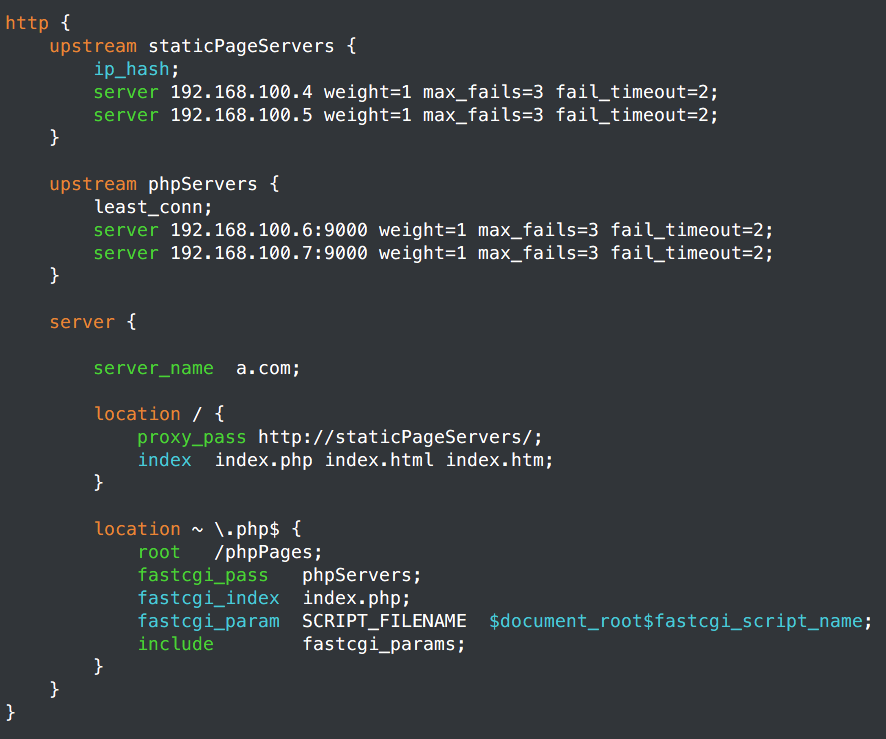
还是和上面一样,这个图是为了让大家看的更直观,这里面很多必须的东西都比删除掉了,只剩下和初始配置不同需要修改的指令。对了,上面开始设置的两台Nginx也有和PHP结合的功能在,不过大家不用去管它,到时候需要用到。
c、给出测试页面
和上面一样在PHP Server的/phpPages目录下面:
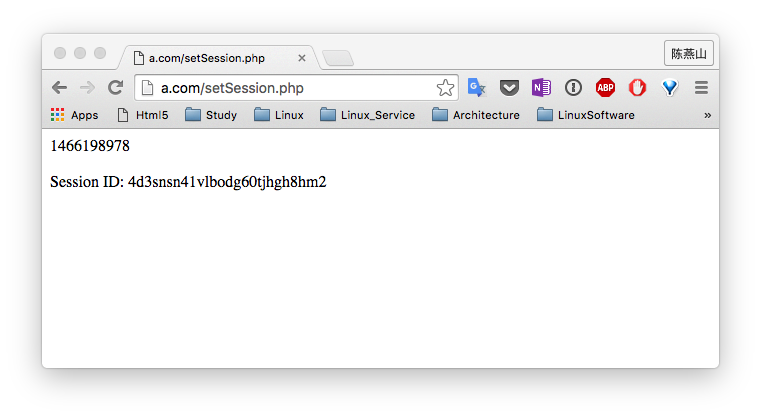
# vim /phpPages/setSession.php
<?php
session_start();
if (!isset($_SESSION['Itcys.top'])) {
$_SESSION['Itcys.top'] = time();
}
print $_SESSION['Itcys.top'];
print "<br><br>";
print "Session ID: " . session_id();
?>
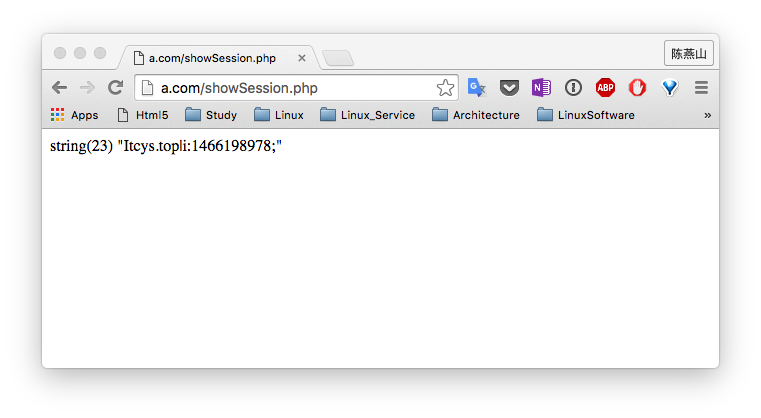
# vim /phpPages/showSession.php
<?php
session_start();
$memcache_obj = new Memcache;
$memcache_obj->connect('192.168.100.8', 11211);
$mysess=session_id();
var_dump($memcache_obj->get($mysess));
$memcache_obj->close();
?>
并将浏览器所在机器的Hosts改一下。Windows用户自己去百度一下
$ sudo echo 192.168.100.10 a.com >> /etc/hosts
d、测试
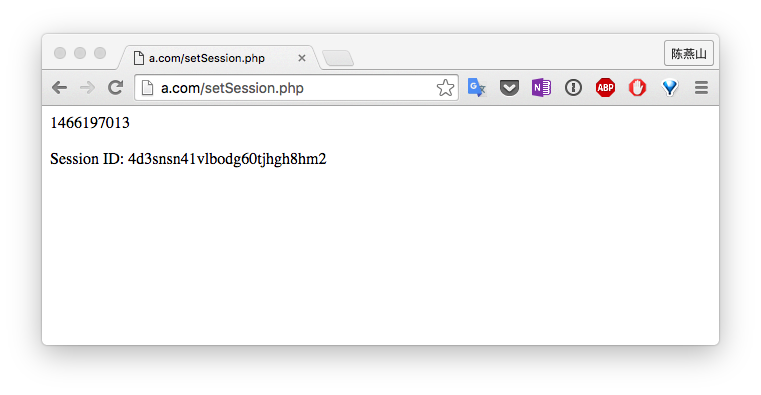

关闭php-node1,只留php-node2
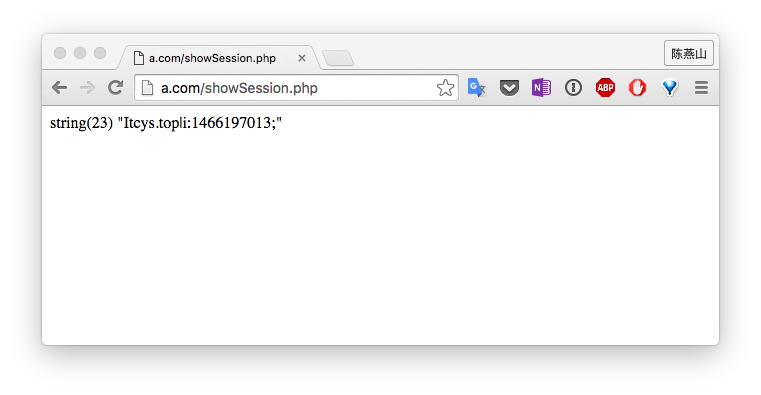
打开php-node1,关闭php-node2

session一直没变,成功保持。而且Nginx作为前端调度器,不像LVS还需要自己写脚本或者借助ldirectord进行后端Server健康检测和增删后端Server。Nginx自己就能实现,不过作为运行在用户空间的7层调度器,性能可以说差不多被运行在Kernel空间的4层调度器LVS完爆5条街。但是适用场景差距太大,还是没有什么可比性。
2、模拟LVS作为前端调度器
为啥叫模拟?因为我就准备直接把Nginx作为前端调度器,把所有请求调度到后端Nginx web服务器。由Web服务器自己和PHP Server交互。这样就和LVS的效果是一样的。感觉LVS直接作为前端调度器的适用场景很少,需要使用LVS或者F5这样的场景来说,基本上已经进行业务解耦,那么LVS后面基本上还是会以Nginx或者HAproxy再做二次调度。
适用场景:
1、LVS作为前端调度器,直接调度到后端Web Server,中间没有Nginx或者HAproxy作为二次调度器 2、Nginx或者HAproxy作为前端调度器,将PHP的请求由Web Server进行处理。由Web Server与PHP Server进行交互

a、配置Nginx调度器
http {
    upstream staticPageServers {
        ip_hash;
        server 192.168.100.4 weight=1 max_fails=3 fail_timeout=2;
        server 192.168.100.5 weight=1 max_fails=3 fail_timeout=2;
    }
...
    server {
...
        server_name  a.com;
...
        location / {
            proxy_pass http://staticPageServers/;
            index  index.php index.html index.htm;
        }
...
    }
}
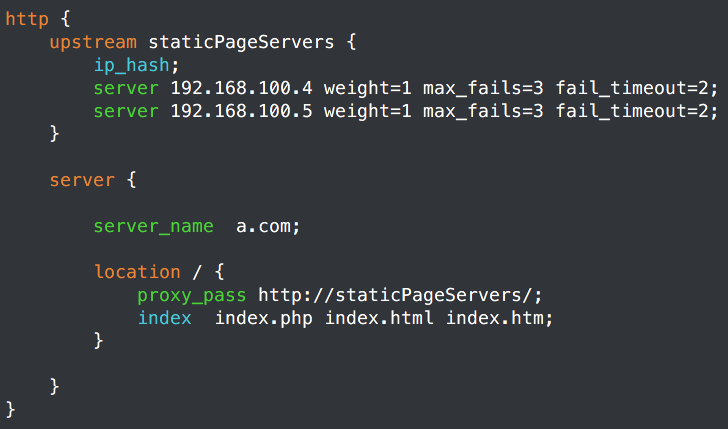
其实就是将所有的请求调度到Web Server,而Web上面之前又设定好了将PHP脚本交由PHP Server处理。
3、测试
之后测试之运行各个单节点,session都没有问题。至此LEMMP完成。整个系统已经差不多了,但是像PHP自身的缓存XCache没有添加上去,XCache作为在PHP内部缓存编译PHP代码之后的op code,能在各个进程共享编译结果。这样还是会大大提升PHP的性能的。毕竟PHP为什么消耗CPU时间,就是因为编译PHP代码需要时间。而且Nginx缓存也没打开。看着这篇blog写下去久没完没了了,而且XCache比较简单,但是nginx的缓存就比较麻烦,到时候结合Nginx的整体特性我会再写一篇Blog。